Beautiful graft union!!! That’s my basic W&T technique. It has worked well for me on multiple species.
1 Like
I’m echoing @thecityman. I’ve got a a psylla problem on my d. virginiana seedlings, and thanks to this thread especially @cousinfloyd and @forestandfarm I know what it is and how to treat it. Additionally, I’ve learned a bunch of specifics about persimmon grafting, which I hope to do this spring, if my seedlings can put on enough growth while fighting the psylla. Thanks again to the many members of this forum who are willing to share their expertise.
1 Like
Don’t feel bad, it took me a couple seasons to figure it out. You are probably not growing them the way I did, but it might offer you some encouragement. Last spring I started persimmons from seed in Rootmaker 18s and then transplanted them to 1 gal rootbuilder II containers in mid-summer. These containers air prune the roots making for a very dense root system. The combination of a late start and the effects of psylla caused many of them to be on the small side for grafting but I gave it a go anyway. I let them go dormant and mulched in the containers to give them the chill hours they needed.
Around Christmas time I brought them indoors and warmed them up and grew them under lights. A few weeks before they produced leaves, I grafted them with Nikita’s Gift scions that Tony graciously provided me. For those close to pencil size in diameter, I used W&T and for the smaller ones I used a wedge type graft. My success rate was far from perfect, but I ended up with quite a few nice trees.
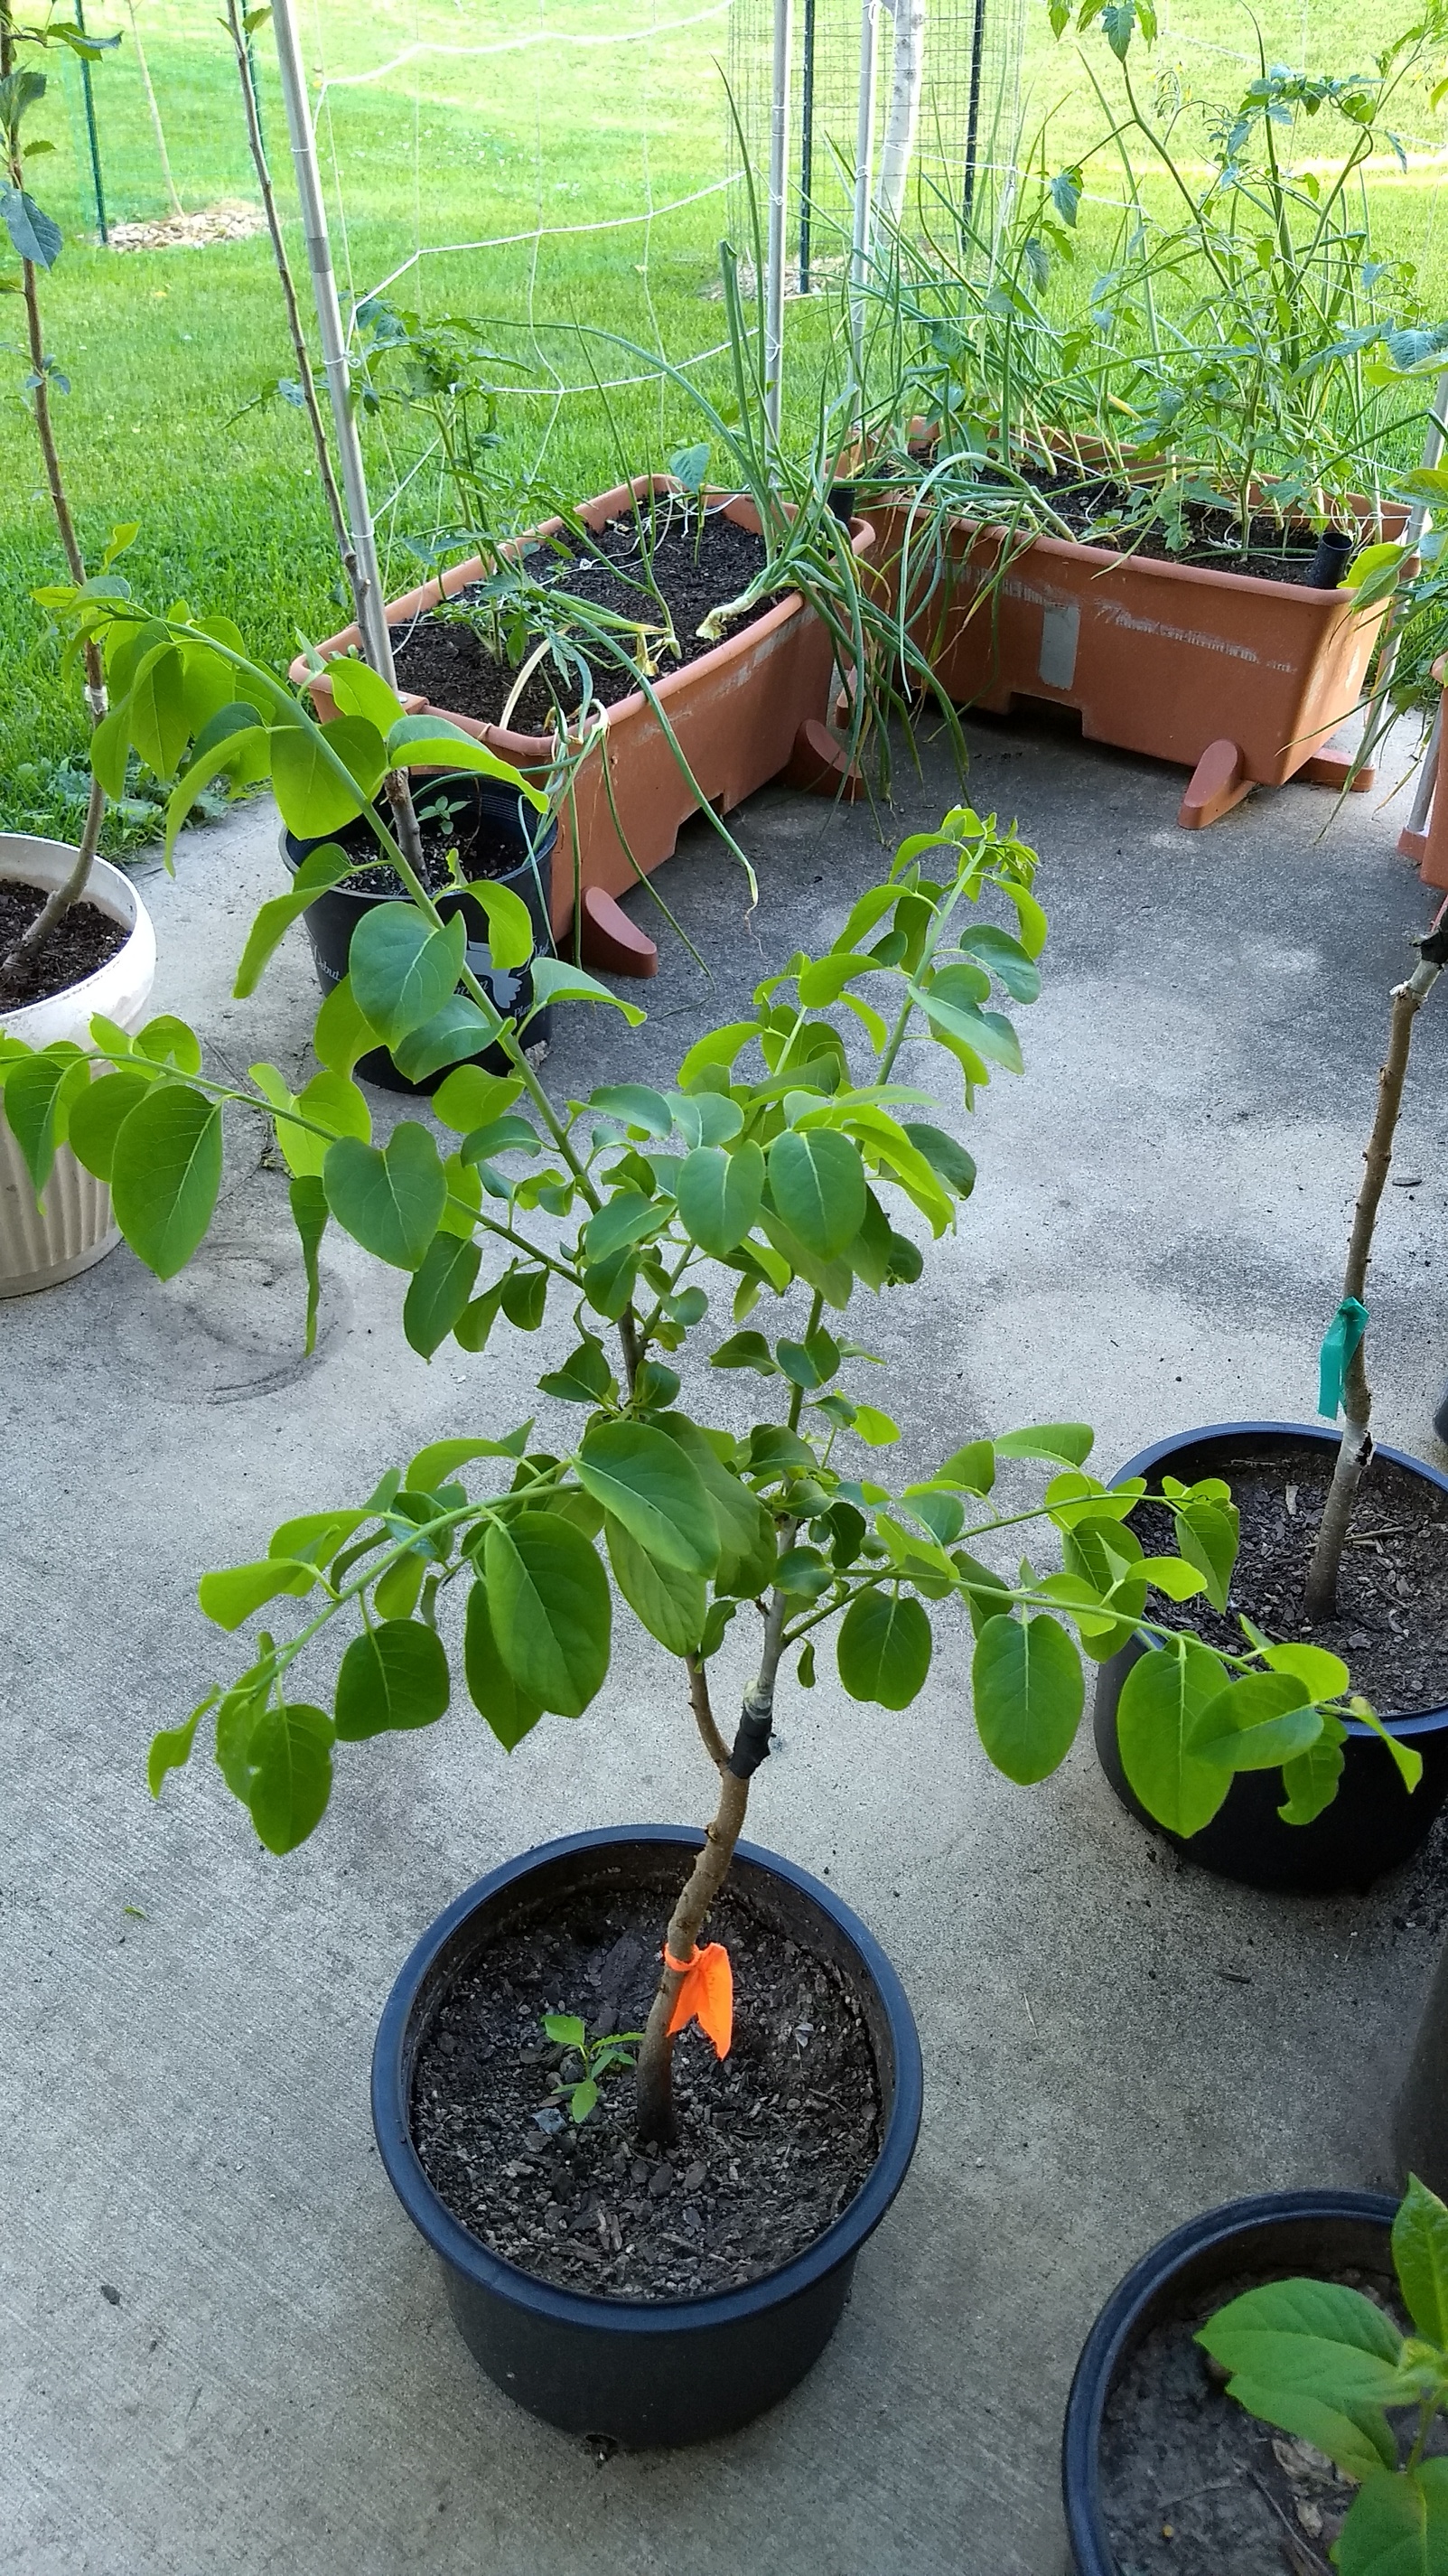
Once I was convinced the grafts took, I transplanted them to 3 gal rootbuilder II containers and kept them on my deck for the summer. By this spring I had learned to catch psylla and treat it before it could cause too much damage. Here is a picture of one that I took on July 11th, so it has grown a bit since then:

I hope to plant them in the field in the next week or so. It goes to show that even when the rootstock is set back by psylla the previous year, you can still get good tree growth after grafting. A few of these trees stalled out in the spring at about a foot, but I’d say most of them are now 4’ to 5’ tall.
Thanks,
Jack
1 Like
@forestandfarm (Jack) I don’t know what I like more about this site- the incredible wealth of information available or the fact that when people give it to me they never make me feel like the dummy I am for not knowing many of the things I ask about! SO thanks for your kindness and special thanks for the information. Also, I had read a good deal about those air pruning pots so I was also interested in hearing and seeing them. They look really neat in your photo. However, it looks like they are sitting on the ground or porch or something. I thought they had to be up off the ground for the roots to be able to come out??? If so, do you then manually trim those roots that come out or do they just dry out and die/fall off?
Your success with persimmon grafting gives me hope, and just like fruitnut said, the photo that shows your graft is incredible. I’ve often read that the better the graft work, the smaller bulge is created at the union. If that’s true, your graft is near perfect because I see no bulge at all. My own grafts, on the other hand, often result in bumps that approach the size of a golf ball! haha Clearly I have a lot to learn.
I can’t wait to try and graft my 4-5 persimmon rootstocks next spring, and I hope I can find people kind enough to give me some scions (knowing the people here I’m not too worried about that!) . Anyway, thanks again for your great info. I only wish I’d known earlier what was going on with the curled up leaves on my hachiyas so I wouldn’t have wasted the second half of summer the way I did!
There are a number of brands of root pruning containers but the ones I use and am most familiar with are Rootmaker brand. Dr. Whitcomb was one of the pioneers in this area and I learned a lot reading his papers. At retail, Rootmaker is a bit pricier than some of the other brands, but I got a commercial account with Rootmaker and the wholesale prices are competitive.
Different brands and even different containers within a brand work differently. The containers I used for this are 18 Express trays and Rootbuilder II. These all use air pruning verses root trapping or root constriction (other root pruning methods).
The 18s are the first step. They prune the tap root and you are correct, they need good air flow beneath them.

This picture happens to be of young pawpaw trees but it gives you an idea of the 18 express trays. The individual cells can be removed. I like them for starting trees under lights because I can use inexpensive fluorescent lights which are cool and keep the lights close to the trees. I can reorganize the cells at any time to keep trees of the same size together. The tray supports the cells so the cells sit above the surface and there are holes in the side of the tray for air to get in. I further place them on wire racks for more air flow.
When the root tip hits the air, it desiccates and there is no open wound for infection to enter like when you prune roots by hand. Once the tap root is pruned, the tree begins sending out secondary and tertiary roots until the they have filled the 18. I use a professional soilless mix which allows for a lot of space for the roots to fill and is very well drained.
The Rootbuilder II containers work slightly differently. They have protrusions that you can see all around the sides of the container with holes in the end of each protrusion. When lateral roots get near the sides of the container, the protrusion routes them to one of the side holes where they are air pruned. The bottom of these containers is solid. They are concave relative to the outside of the container and convex relative to the inside. They also have ridges that radiate out toward the sides. When roots hit the bottom, they are routed along that convex plastic bottom to one of the lower side holes where the root is again air pruned.
When I unwrap one of these containers and look at the root ball, the bottom looks like a star with roots radiating out from the center. I have seen no circling or j-hooking using these.
By contrast, I have friends who use burlap-style bags for root pruning. The material weave is coarse enough for roots to grow through the bag and get air pruned. The problem with these bags is that if you don’t have good air flow on all sides including the bottom you can have issues. I’ve seen guys leave these on the ground and have the roots grow through the bag right into the soil.
Thanks,
Jack
1 Like
Jack, I can’t tell you how much I enjoyed that post and I suspect many others will as well. As I said, I’d always been curious about those types of pots but never quite understood them until now, so thanks. Just so I’m clear, when you say the root gets “air pruned”, you are saying that it grows out into the air, and once it does so the air (and/or lack of moisture and dirt) causes it (that root) to die, right? I was also surprised to see that you even used these pots/techniques on paw paws. Everything I’ve ever read about paw paw trees suggested that they have extremely long and very important tap roots that are required for life. Seeing you use pots that, by design, prevents/prunes that tap root is surprising and interesting.
You’ve already given me too much time, but if I may I’d like to explore the persimmon psylla a bit more. I just came back in from examing my 2 hachiyas (that are still complete trees). First off, the new leaves had LOTS of ants all over them, so I’m more convinced than ever that I’ve got psylla. But when I look under the curled up leaves, I didn’t see anything that looked like tiny white eggs. What I did see a lot of were something that looked very much like really thickly woven spider webs. In fact, in several places on my persimmon trees there are 2 leaves that are attached together by this web looking stuff. I also spoted quite a few tiny green catapiller-looking “worms”. I suspect that they are creating the web-like material. By chance are these adult psylla? If not, any idea what they are?
I must confess that because my entire orchard was almost entirely fruit-free this year (thanks to a neighbors reckless use of 2, 4-D) I’ve been extremely lax about spraying this year. Its hard to make myself spend the time and money on spraying when I knew there was no fruit to protect, but I now understand that was a very poor orchard management because of things like the persimmons and having had psylla and all my peach trees loosing all their tips to OFM, CM, or something. So I’ve learned spraying is important even if there is no fruit.
Anyway, thanks for all your help. Hopefully, as I suspect, this thread will help more people than me and some (like @haldog) have already said so. Thanks
I’m no expert on insect infestation, I just have some hands-on with psylla. The adults are flying insects. You may be looking at a larval stage. It is very hard to describe in words compared to pictures. If you google persimmon psylla, you will find good pictures of the insects. That is probably your best bet for deciding if what you are seeing is consistent.
As for the root pruning containers, there are several methods. One is air pruning. As you suspect, the end of the root terminates when it hits the air and this causes upstream branching of the root. It is best to do this every 4 inches. Dr. Whitcomb wrote a short paper that describes it better than I can: 4 inch rule
There are also other methods for root pruning. One is a fabric capture. Soft sided containers are designed with a fabric that captures small root tips and won’t let them go. That prevents them from circling or J-hooking like in a normal hard sided container. This again causes upstream branching.
Another method is root constriction. These are usually in-ground fabric bags with tiny holes. tiny root tips grow through the fabric but the fabric doesn’t stretch and the roots are constricted which again causes upstream branching.
Nothing is free. You mentioned the long tap root that both persimmons and pawpaw have in nature. That is natures insurance against drought. The tree puts a lot of energy into developing that tap root when young so that it can be sure to have access to water in a drought. That is energy that is not going into plant development elsewhere. The efficiency of a root system is generally defined by the number of fine root tips. Air pruning causes this early branching producing many more root tips allowing the plant to much more efficiently use nutrition and water given that it is in it is available in its footprint.
So, you are trading drought insurance for early plant development when you use root pruning containers. You also avoid the J-hooking and circling that can be problematic in the later life of a tree but you can avoid this with direct seeding as well.
So, with a rootmaker tree, it is important to either provide supplemental water or live in an area where sufficient water is available naturally until the tree is well established.
So far I can vouch for great root systems being developed using these containers for persimmon, pawpaw, chestnut, jujube, and crabapple.
Good luck with your orchard!
Thank you for such an informative post! I love reading all these expansive experiences… I’m thinking of getting into the persimmon world sometime.
I think you referred to my graft, I only posted the best one. I have some gnarly looking ones too but they are also growing well, so no big deal! Good enough is perfect.
1 Like
Once again, thanks for the great info- extremely helpful! And yes, I accidently attributed Kelby’s graft photo to Jack. Sorry about that.
I have a little anecdotal experience with persimmon psylla. Being up here in Mi, I figured I would be safe (as it is very rare to see American persimmon, never mind the Asian I was growing (I will explain the was next paragraph). I had psylla the second year and every year afterwards. This was Ichihi-Ki-Kei Jiro ( forget it, spell check on my iPad won’t let me fix the name). I got some control with soapy water and removing damaged leaves. My guess is the pest must have an alternative host.
My ichi was killed back a couple winters ago ( the first really cold winter we had). Up until then it was doing great and I had gotten fruit from it yearly for quite a few years. I’m hoping to regraft it.
Scott
Feeling very fortunate on my first ever Persimmons grafting attempt. Grafted this Jiro onto native Persimmons on March 27th and so far doing ok. Fingers crossed. Should I pull the tape or leave it alone?


2 Likes
I batted .500 on my first try grafting persimmons. One of my early grafts took and one of my later grafts took, out of 4 varieties, so no pattern on timing/temperature.

4 Likes
It’s hard to tell for sure, but from what I can see in the 2ed photo it looks like your rootstock tree had a fork and you only grafted one prong on the fork, meaning you will have whatever fruit (if any) that the rootstock tree will produce (is it a specific variety or do you know) and then you’ll get whatever the scion is. That is pretty neat. Most of mine are like that as well.
Your first photo is also really interesting to me. Because of the shape of the original tree and where the scion grew out, it has create a quite crooked tree. ha. Nothing wrong with that as far as I know, and over time it will probably straighten itself out anyway- I just thought it was interesting.
Hey Drew, far be it for me and my whooping 28% persimmon grafting success rate to offer advice to anyone, but I think you really out to consider somehow bracing the graft in the first photo. Because of the long, offset shape of the whole tree and it being so tall and skinny and then having that very long growth on the scion, when the wind blows there is a good chance it will break off- even with the tape in place. As mentioned above, I had a persimmon graft get just about the size of that one and THEN fail. I’m almost certain it is because the wind cause the graft union to crack or separate to the point that the bond was broken. And I HAVE 100% CERTAIN lost apple grafts to wind when I had heavy, new growth at the end of a tall, thin rootstock and scion (ie just what you have there). Anyway, you know as much about grafting as I do, but having had wind destroy more than one of my grafts that looked like yours, I just had to remind you that would be a good idea to attach that tree to a big stick or something stable driven into the ground. Good luck!
5 Likes
Wow! Very nice!
1 Like
Yeah Kevin I’m pretty excited. It looks like a crooked tree but the photos don’t show the top. There is about 5 feet of a central leader going up past the branch where I grafted on. I will probably take scion wood from this one if it stays successful and place about 3 more grafts on the other branches and maybe even the central leader. Who knows. Fun times. Love it!!
2 Likes
The second photo is actually two cleft grafts on two forks of the rootstock. That was one of my later grafts and I stuck two scions on it hoping for a take. So I suppose my real take rate is 3/5.
The crookedness is partly from where they are growing these last 2 years. The patio gets morning to about 3pm sun. I’d like straight, but I was more concerned to get a good scion to rootstock match, so it ended up on an angle. I should rotate the pots 90 degrees every time I water. ha!
Another good point. I will do that tomorrow.
1 Like
I also will add that I’m a little concerned about these trees, and the hardiness of the rootstock from Burnt Ridge. I planted some out in the field last year, and all had some degree of winter die-back. And we didn’t have too hard of a winter last year.
Alan posted somewhere that he thought tree shelters might cause trees to heat up in the late winter sun and be damaged due to cold snaps/night-time temperature drops. That is definitely possible for those field-grown trees.
1 Like
If it makes you feel better, I was actually talking about Drew’s tree looking crooked! ha. From what I can see yours look fine, but either way I don’t think it much matters. I like your idea of doing multiple grafts on a tree…I just hope you do better than I did. I hate to tell this, but I put 4 grafts onto one small persimmon tree with hopes of just completely reworking it (2 scions each of 2 varieties). Well, on that particular tree only 1 graft took, and after 2 months of outstanding growth, it suddenly died too. So I was 0 for 4 on that tree. GRRR! But no reason to think you can’t do better. I do mostly saddle grafts with an Omega tool and that’s not the ideal technique, I know. But its quick, it requires no knife or other skills to speak of, so I do it more than I should. You will probably use more effective techniques. Good luck.
2 Likes
Can I graft native persimmon scion to Asian persimmon stock? I read somewhere that has low chance of success versus Asian on native.