I’ve started my own seeds for three four years now and while I am FAR from mastering it, I do think I finally have a system that works for me.
Here are all the materials I use for starting seeds. FYI there’s going to be a lot of links but I am not affiliated with any of them:
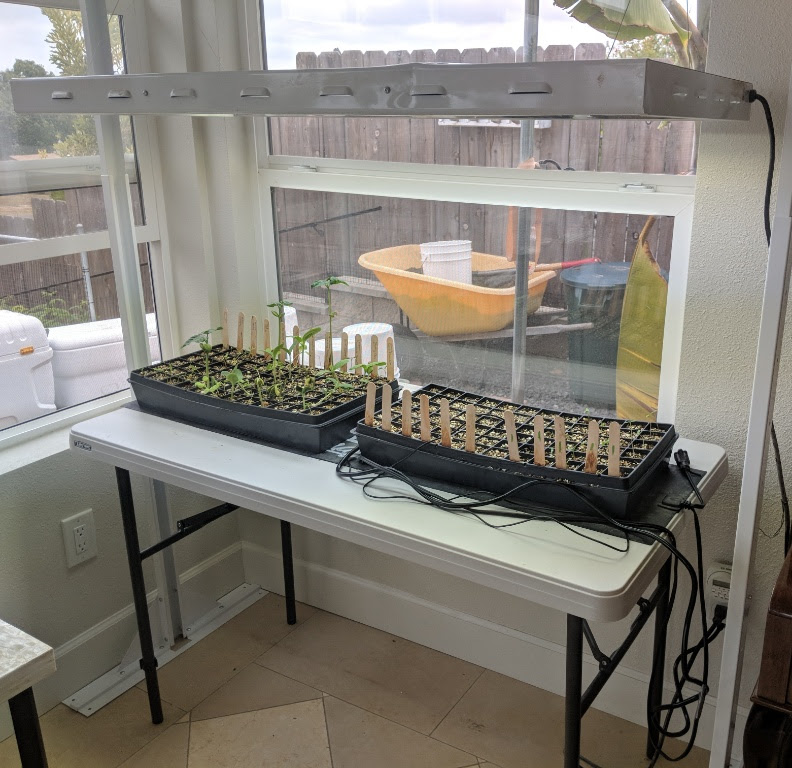
Heavy duty 1020 seed starting trays - Honestly, this might be my favorite purchase. If you’ve ever had a seed tray break in half while you are carrying it or develop a pin hole and leak water everywhere you are ready for this upgrade. I use these a lot more than just starting seeds now that I have them. They also sell a kit with inserts, pots and a humidity dome.
A heat mat and a temperature controller - Critical for good germination of warm season plants like peppers, cucumbers/melons and tomatoes where you want the temps to be at 80-85°F. You don’t need it as much after the germination stage unless you are growing in a cold basement where the temps go down below 60°F. They come in various sizes so buy the right one if you are starting more than one tray! You can also use any place that remains a steady 80°F like the top of the fridge, oven with the light on, top of water heater, etc. NOTE: A temperature controller is a MUST or you will fry your seedlings.
Seed starting mix - you can buy it premade or make your own. I prefer a blend of 1 part peat moss or coco coir, 1 part perlite or coarse diatomaceous earth or coarse sand and 1 part vermiculite. Next year I will also be adding worm castings as a way to add nutrients and beneficial microbes. The mix doesn’t matter so much as you knowing how often to water it.
Fertilizer - This is something I am still figuring out and trying to simplify. What I plan on doing is adding a slow release fertilizer like Osmocote to my potting mix as well as worm castings. Since they are both slow release you may need to use a 1/3 dose of liquid fertilizer should you notice slow growth or yellowing at the true leaf stage. It’s important to know that using too much fertilizer can lead to problems that look just like not having enough fertilizer, so its always better to start at 1/4 strength and/or spread the application over several week.
Grow light - Even with a very sunny south facing window I have found that my seedlings still get leggy. A T6 shop light will get the job done if you hang it 2" above the seedlings but if you are planning on starting seeds more than one year I would definitely get a dedicated grow light. This HLG-65 light is my go-to recommendation because it works out of the box, is a natural color, and is extremely energy efficient. If you need a larger growing area the HLG-100 covers a 3x3’ area. If you are starting tomato plants or peppers definitely go for the HLG-100, you will need the extra space.
(A how to for starting seeds will probably be added here when I start seeds for 2020)
Standard grow flats with humidity domes…bottom watering of course, and incremental misting.
2 10x20 heat mats (not pictured)
Starting mix is 1/4 vermiculite, 1/4 perlite, 1/4 coir, and 1/4 compost
No Fertizer (nutrients from seed itself and compost)
6500K T8 LED lights (4ft x2)
This setup cost me around 60 bucks for the lights, mats, and flats. I buy perlite and vermiculite in bulk from local garden supply store. My compost is home made with kitchen scraps, yard waste, chicken manure, and worm castings.
I have used those seed starting trays! Currently using them to start some alpine strawberries. They are pretty awesome for small plants. Do you up-pot or are these going straight into the graden?
The reason I use the fertilizer is because I start plants many weeks before last frost date so they get very large and hungry by the time its just warm enough to transplant them out. I’m also trying to minimize the number of times I have to up-pot.
I’m mostly just starting tomatoes, grafted melons, egg plants, peppers and flowers. Everything else gets direct seeded.
Normally I put them into individual pots once the true leaves are out. The pots that I use are the ultra-cheap 12-ct. packs of small 3.5x3-in. pots from dollar tree (1$, cant beat the price). They are extremely flimsy, but once soil or potting mix is added, they are tough enough. And after I put the starts in the garden, I wash/sanitize them with 10% bleach for the next round of plants.
As a side note, we are in the same growing zone. What kind of things do you have success with where you are at?
Veggies have been a walk in the park when compared to growing perennial fruit. I’ve grown tomatoes, peppers, cucumbers and egg plants with little to no spraying and have gotten reliably high yields. Melons got destroyed by fusarium wilt towards the end of the season so I am trying grafting this year. In late March I direct seed peas, spinach, radishes and beets - they are very low maintenance and you just have to remember to reseed every 2 weeks to get a steady harvest through the year.
For an annual fruit you should try ground cherries (aka golden berries), very easy to grow and have abundant and steady yield.
I’m doing this for the first time this year. i am going to start with the Veggies mentioned above and a few more. I have a question. I have two sets of T-5 Grow lights with stands, Timers, Heat pads the whole thing. But… I am doing this at my farm where I am only there on the weekend. I have the Nice thick pot trays you mention and the flat trays for underneath them. How would I maintain a proper water schedule only being there Friday thru Sunday? Will a watering on Sunday afternoon do fine without misting until Friday? Or am I wasting my time. Thanks
I think the best solution for you would be a small drip irrigation system on a timer. You can get a decent timer for $20-30 and parts for the irrigation system for another $30 (or just drill a bunch of tiny holes in some PVC.) I would also not use the heating mat once the seeds are germinated maybe even keep the plants slightly cool to slow growth and evaporation, but then you would want to start them a week or two earlier.
It’s not ideal but you’ll probably be ok with a very deep once weekly watering until the plants are putting out their second set of true leaves (depending on pot size), but once they get bigger than that they start getting really thirsty.
I like speeding float trays.
These are styrofoam trays with soil mix that float in a few inches of water.
The soil mix has to be right or they will draw to much water.and drowned .
Ether use a float tray soil mix , or custom make by using something like promix HP and add more perlite for buoyancy .
I start seeds in these and float in water, come back and pull transplants.
Usually works very well , low maintanance .
They used to grow tobacco around here, toward the end of that industry, everyone grew there plants in these float beds.
I use 200ct. Trays for greens, / 72ct for tomatoes and peppers.
For the water , a level area lined with plastic , lumber frame on sides.
Or something like a mortar tub works for individual trays .
I thought I would follow up on this to share my veggie schedule that I recently updated. Still a work in progress but might be useful to those in zone 7. If you are in a different zone you just need to figure out how your last frost date differs than mine (April 20) and adjust the dates for starting seeds and transplanting accordingly.
The color code is BLUE = start indoors, YELLOW = direct seed, GREEN = transplant out, ORANGE = harvest
So for example reading this chart I would start tomatoes in the second half of February, or very early March - but that is less ideal. I would then (after hardening off) be transplanting them out in early May, weather permitting. Lastly, I would expect a harvest from early varieties in late June or more likely early July continuing on until they lose productivity and then frost kills them.
Thanks for starting this thread. I have not been using a grow light but have ended up with really leggy seedlings so am going to switch to a grow light this year.
Do you folks do anything for humidity once the seedlings are going? I never have.
My simple starting method is to put the seeds on a wet paper towel then into a baggie and into a warm area like over fridge. I really like how I can detect dud batches early this way, instead of waiting waiting waiting.
I’m in zone 7 also so I thought I’d weigh in on when I start seeds. I consider my last frost date April 15, but I try and use a layer of protection when I plant out.
I started spinach on 2/3.
I plan on starting tomatoes, eggplants, and peppers on March 4th. I have started them earlier, but find they get too big for me to deal with in the weeks leading up to transplant. I also start these plants in the same seed starting tray for convenience, and transplant to red solo cups when they have two to four true leaves. Again, if I start too early, I have to transplant to even bigger pots, which makes hardening off more difficult and I simply don’t have the grow light space for that.
I will start kale, cabbage, kohlrabi and collards tomorrow in a 36 cell flat. I will keep indoors until they germinate, then move them under a grow light in my garage, where it is cooler. Brassicas have always been the hardest for me to start.
I start lettuce in the middle of February. It always gets too big and gets stressed out when I transplant it, but makes a comeback.
I tried starting beets indoors last year but am not going to again this year. They seemed to do about the same as the ones I direct sowed…terribly.
Swiss Chard will be started March 1st.
Cucumbers April 1st, though last year the plants started indoors did about the same as those directly sown…great! Its funny that they seem to start making fruit at around the same time either way. I dunno.
No, I sometimes use plastic wrap cover for helping with seed germination and humidity domes for graft healing but otherwise my growing area is 45-50% humidity and seedlings and young plants do great.
@growjimgrow I’m surprised to see so many people starting all these leafy greens indoors. I tried it for three years and always found that direct seeded plants consistently perform better. Granted, I am planting them in raised beds in a very sunny location so maybe the extra heat helps things move along faster?
IMO its much easier to build a low tunnel or throw some clear poly over the seeded area than have to harden off and transplant dozens of tiny seedlings. Id rather use that precious grow light space to get my “fruiting” plants like peppers and tomatoes as large as possible.
I did have the same experience with you in regards to transplanting cucumbers & melons. They don’t take well to it and direct seeded ones seem to catch up to the ones started indoors. I will be doing melon grafting this year so I have no other option I guess.
For me, its about extending my growing season. Unlike the beets and cucumbers, the transplanted greens will produce earlier than those that are directly sown. I keep them under a hoop house in a raised bed and the ones that make it through the hardening process grow very well, giving me two or three extra weeks of greens and lettuce.