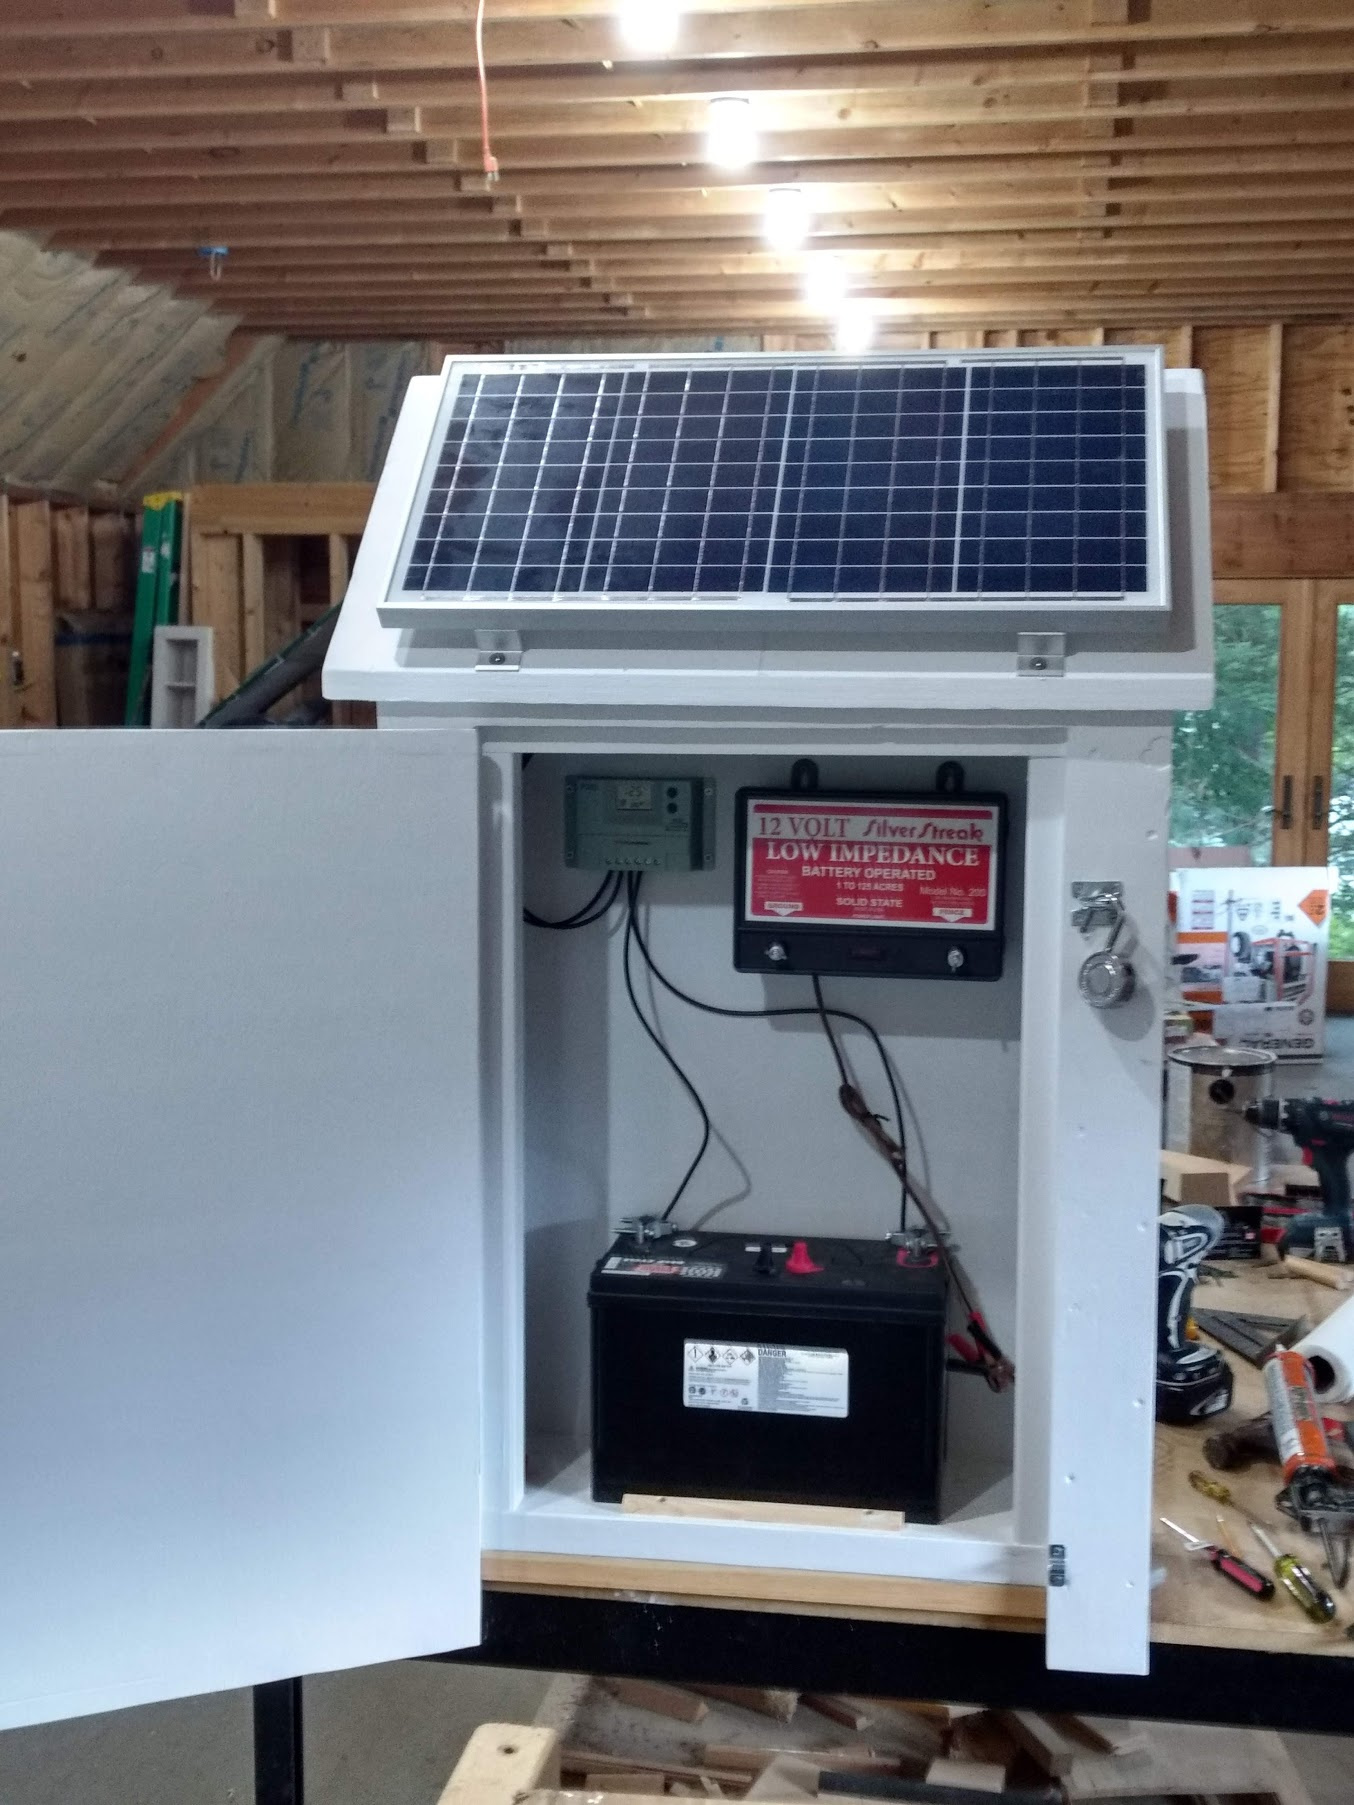
My solar electric fence charger from Tractor Supply has proven woefully inadequate. I suspected as much when I bought it, but I hadn’t yet researched my options and figured if it got me through a couple years it would have served its purpose. Well, now I’ve done my research and pictured is what I have put together. This will be for my orchard site where I have no electricity.
The system is made up of a solar panel, controller, deep cycle battery and a battery powered fence charger. The Zareba I’m currently using puts out .15 Jules. This system will put out 2.0 Jules. I built the cabinet to protect the components and painted it white to try and limit heat in the summer. I’ll lag screw a 4x4 to each side and drop the posts in the ground. This cost approx $300 to put together (excluding the scrap wood and plywood I used to build the cabinet.
Thought I’d post this in case someone else has a need for something like this with no electrical source.


Hmm… Should have doubled the size of everything.
No, wait just being facetious. Very nicely done! Got to love those do-it-yourself projects.
Weve Tried many solar options over the Years. Seems if it functions well. Someone Runs it over with a tractor, lol. And yes Tractor Supply’s Chargers/ Shockers didnt hold up well. Seemed to fade in 3 months not really turn away any animals.
One sure Remedy weve used for years is rotating Batteries. From Stationary Equipment to Tractors & UTVs.
How many days will it take to charge up the battery? I know that with the Tractor Supply controller (5 miles) the manual specified 3 days of charging with it clicked off before being grounded and connected to the fence. Of course, your battery may be already charged. I don’t know.
Yes, it’s already charged, had the fence charger flashing away. This system should recover fully every day allowing it to function all night. My other goal was to keep it functioning all winter.
My (Tractor Supply) solar fence charger (energizer?) is on it’s 2nd year and doing fine. Having an easily replaceable battery like that would certainly be better though. If the battery on this one dies I’ll likely do something similar. My tester shows it’s putting out about 9000 volts and it certainly got our dog’s attention when she got too close. Won’t go near my orchard any more…
A note I ran into the other day about Joule rating and fences FYI: https://www.afence.com/Electric_Fence/how_to_elecfence/Joulerelation.htm
I’ve been very interested in something like this for awhile, thanks for the post!
That’s interesting. I’ll have to review additional info to better understand the difference in these systems. Either way, I think the size of the battery is indicative of the difference in the systems. My interest in a new system is based upon a much larger area I intend to protect. Thanks for the info.
I put this together based upon recommendations for a portable system that fit in a plastic Stanley Waterproof Tool Box. Recommendations were for the following: AC/DC 2.0 Joule Energizer; 12V Deep Cycle Rechargeable Battery; 20 Amp Solar Charge Controller; 30Watt Solar Panel. Check YouTube for Mastodon Valley Farm.
A good fence charger must have an interrupter and a coil and preferably also have a spike coil which is triggered if the fence is grounded. The spike coil is intended to chop weeds if they get on the fence. Most cheap fence chargers are severely lacking robustness in components. They go bad after a year or two. I have had a couple of cheapos over the years and regret buying them.
I bought a parmak solar charger for about $260 3 years ago. So far, it has been more than adequate for my purposes. I only use it during June to late September to protect my garden from raccoons and deer. If I were using it over the winter, I would add a larger solar panel, somewhere in the range of 50 watts and a larger battery so it would charge enough in 4 or 5 hours to last all night.
One of those little hacks that I have seen recommended is to wire up a 100 watt (tungsten filament) light bulb in series with the electric fence. Please don’t do this. It puts permanent battery on the wire which means an animal won’t be able to get away from it in some conditions.
Thanks for posting this Andy. That’s a great looking box you built.
It just so happens I plan to attach an electric fence to my deer fence to try to limit the amount of destruction from coons and possums. I have a few questions I’d like to get you and Fusion Power’s opinions on, if you don’t mind. (Or if anyone else has any thoughts, please chime in.)
I plan to use a little stronger charger, as I plan to have more fence. I plan to go with this charger:
I figured I’d use a 50W solar panel like this one:
https://www.amazon.com/HQST-Watt-Polycrystalline-Solar-Panel/dp/B018BLW1R4/ref=sr_1_14?dchild=1&keywords=40+watt+solar+panel&qid=1598759471&sr=8-14
One question I have is, do you know what size solar charge controller should be used? You used a 20 amp controller, but I don’t know anything about controllers, and don’t know if that would be adequate to control the size of the solar panel and fence charger. Also I want to get a high quality solar charge controller, but I’ve no idea what to look for. I know a lot about electrical wiring, main panels, etc., but I know next to nothing when it comes to electronics. I’d like to use the very best quality components, so to avoid, as much as possible, fixing it very once it’s built.
Did those little angle aluminum mounts come with your unit, or did you have to buy those extra? If you had to buy those, would you mind posting a link for them?
Also, what size deep cycle battery did you use? You seemed to use a AGM deep cell, though I can’t tell for sure from the pictures. Was that because it’s maintenance free? My understanding a flooded deep cycle lasts longer (for stationary applications) even though it requires maintenance, correct?
I see you placed your solar panel at an angle, as I’ve seen with all the factory built solar chargers. I assume this is for the optimum angle of the sun? Since I only plan to keep my electric fence on during the summer, do you see any problem with lowering the angle of the solar panel to slightly above horizontal. I obviously wouldn’t want to put it completely horizontal because then it wouldn’t shed rain or allow the buildup of debris on the glass panel. I was thinking perhaps having the panel closer to horizontal might capture more of the sun’s energy in the season I’d be using it. Of course it could accumulate more snow on top of it, if it’s horizontal, but I’m thinking it would be hard to get enough snow to break the glass. Thoughts?
After doing a little research, this is the solar charge controller I’m thinking of using (Steca model 2525) It appears to be good quality, I think.
It’s a 25 amp, and I know V X A = Watts, which in this case would seem to be plenty big for a 50 watt solar panel. I just don’t know if the controller needs to be oversized for some reason in this application.
https://www.steca.com/index.php?Steca-Solsum-en#productdescription
I must confess I know nothing about electricity and I relied on the recommendations of the guy from Mastodon Valley Farm who used his system to keep beef cattle in.
The brackets came with the solar panel as part of a kit. I was able to find the solar panel and charge controller as a kit in the sizes recommended. The battery is a marine deep cycle, I relied on my battery place to recommend what to use after explaining what I was doing. We don’t have a solar business locally or I would have considered going through a local business for more educated input.
The instructions with the solar panel recommend the mounting angle should be equal to the latitude location of where you are installing the solar panels. Latitude here is 43 degrees so I went with a standard 45 for construction of the cabinet (when researching a solar kiln the recommendation was to increase that by 10 degrees IF you intended to use the kiln in winter.) Being farther south than me and intending to use your system only in summer you should be able to lay your panel flatter. Snow accumulation during your off season should be no problem. Roof mounted solar systems here in the northeast hold up just fine.
Sorry I’m not more helpful on the technical info. What I liked about this system was the ability to swap out the individual components. I can replace just the parts that fail or prove inadequate, rather than buy a whole new fully incorporated solar fence energizer. Responses to this post have already given me more info on what to look for should I need to revise my system in the future.
Thanks Darrel, food for thought should I need to swap out my energizer.
Will hopefully help deciding on controller size: Solar Charge Controller Sizing and How to Choose One - Renogy United States
Thanks wdingus for the link. Looks like the 25 amp energizer may be a bit of overkill.
@AndySmith what amp battery did you use? Btw, I really like the way you made your box completely rainproof. The eave for the solar panel, covers the top of the door, so no rain can get in that way. Then you extended the door below the floor of the cabinet, so no rain can come through the bottom. You put some thought into that.
I did notice you had a latch on the bottom of the door, as well as a lock on the top. I know why you did that. Plywood doors warp easy. It’s annoying to have the bottom or the top of the door not meet the jamb. Other than a double latch, as you have done, I don’t know another solution. Perhaps building a rigid frame out of angle iron (or a glued wood frame) and screwing it to the backside of the door is the only other answer. The old “Z” brace really doesn’t work to keep a plywood door from warping.
Olpea, let us know how this works out for you. I might make the same one you are making, it looks like solid setup!
We have a couple plywood doors “flattened” and braced with angle iron! The scrap CDX I used on this was already warped. I’m not sure about the amps on the battery, I’ll check and let you know. There’s actually little info listed on the battery itself. I attached the posts and set it in the ground today and hooked it up to the nursery bed fence, replacing the old energizer. I was too chicken to “test” it out! I hate electric shocks…
Purchase an electric fence voltage tester. Just last week I got one at Tractor Supply. Regret not buying one years ago. The cheap one ($18.99) with the eight lights is okay although some folks complain about not being able to readily see the lights in full sun. Or if money is no problem purchase a digital model. Not only can you test the fence, it is also possible the test your ground.
Did you think about having a light on the outside of the cabinet indicating if the fence OK or not?
Aww, come on Andy. Just grab the fence and see if it rattles your teeth. That’s the best test. 