Cool! I prefer Shogi or Bao myself. P.S. It’s Eli in Da U.P. if that is less confusing. ![]()
2 Likes
I can see the pieces move in front of me. It all looks real. My mind is very mathematical.
It’s always been that way (seeing ahead) the best sport route to score a soccer goal or hitting a tennis ball. Seeing the advantage, always, Linda. of UP

Dax
1 Like
I think it’s time to give an update/results of my hot callusing system I made last year to graft grape rootstock /cuttings.

Picture 1: Grafted cuttings, 3 weeks after hot callusing (graft and rooting). 1 out of 6 didn’t take (and one given to a friend).

Picture 2: Three of them one month later (end of april)

Picture 3: The same grapes, end of august.

Picture 4: The same grafted grapes as they are standing now. I have to dig them out, because the roots have grown through the pots! They look greater on the picture as they really are. I’ve cut them at +/- 120 cm above pot/soil.
Because of this (modest) success, I made a new, final version, with minor modifications:
- More space for the roots to form (and more space for placing the cuttings)
- The same increase at the window side
- Increased number of stocks
I also decided to do a test first to evaluate different grafting methods (omega, whip & tongue, bud, saddle), longer scions compared to short scions, and the use of rooting hormones (at the grafting surfaces and at the base of the rootstocks). To apply rooting hormones (with a brush) I made a deluted solution of clonex gel.
The whip & tongue grafts are all wrapped with raphia. The others partly wrapped, but all of them are finally also wrapped with parafilm (as far as they are “naked”). The burried part is not wrapped.
To exclude the influence of the compatibility between rootstock en grafted variety, and the rooting properties of the rootstock, all grafts were done using the same rootstock variety and the same variety of grape. Grafts done the same way I’ve given the same tape colour (listed on paper of course).
To prevent the cuttings/rootstocks from dehydration, I filled the area between the ducts with moist cococoir. Every now and then I add some water. The rooting duct is also filled with moist cococoir.
I started this test january 17 (partly 19), so less then 3 weeks ago. The roomtemperature (cellar) is +/- 12 °C. Temperature in the ducts (27 … 28.5 °C).
Some pictures of this new setup:

Picture 5. I put some waterbottles on the insulation on top of the window to keep it flat.

Picture 6: Frontview. Slots are “cut” with heating wire.

Picture 7. Insulation above window removed.

Picture 8.

Picture 9. Different colours for different parameters. To prevent too much loss of heat, I filled several slots with insulation pieces.

Picture 10: The callus already visible (graft at right).

Picture 11: When wrapped with raphia, the callus isn’t always visible, but on the middle one the callus is coming through the raphia.

Picture 12: Callus around omega grafts. Obviously, raphia isn’t necessary for omega grafts, but probably they will heal “cleaner” with raphia.

Picture 13: A few of the buds are already sprouting (not sure they will take). These are the short scions, so the buds are in the heated area.

Picture 14: A lot of the rootstocks have already started rooting (removed some of the cococoir with a small fork).
Although this test is only running for less then 3 weeks, and I used a very limited amount of cuttings, I think I can already take some conclusions:
-Raphia is not necessary for omega and saddle grafts.
-
Buds of short scions probably will break before callusing is finished (using energy stored in the scion necessary for callusing). Can be a cause for fail. Better to use longer scions, so the buds are outside of the heated duct.
-
At the graft-area, I have to apply more parafilm (film breaks rapidly when callus starts to form).
-Although I have the manual omega-grafting tool for many years I didn’t use it anymore because of the low takes. This year I decided to give it a new try after sharpening the blade with a dremel and a fine grindstone. As far as I can judge for this moment, the results will be much better.
I also have a few questions:
- I know commercial nurseries use very short scions to graft grapes (even shorter then I used). Does anyone know why? Is it because callusing is better/quicker below a node? Do longer one-bud-scions have disadvantages?
- It seems that a lot of these test-grafts will survive (taken into account of the experience of last year). However, it is too cold to transplant them after a few more weeks and place them already in the greenhouse. Can I store them in the refrigerator where I keep the scions and rootstocks for future grafting (+/- 2°C) to keep them dormant again, until they can be planted outdoors?
Jack
5 Likes
Thanks for those photos. Very professional.
Very short scions are beneficial for grapes as grapes are unrooted. Longer scions will take more energy from the unrooted rootstock which also need to conserve the energy to produce roots.
I’ve found that short scions (1-2 nodes at most) have the best chance of making it – unless you are grafting on a tree in the field with well established roots.
I believe the answer to your second question is yes though I have not done it yet. This is exactly what I plan to do this year.
1 Like
Update 02152023
Because too many roots became visible, and the callousing looked more or less completed, I decided to stop the grafting/callousing/rooting-test. I took all the grafted cuttings out of the “incubator” to evaluate them. From some of those with raphia and parafilm I removed the raphia and parafilm (with a razorblade) to see if callousing happened (rewrapped them afterwards of course). As you can see on the pictures below, this test was very positive. How many of them will make it? We will see after a few months, because I’ve put them all back in the refrigerator to keep them dormant again. But none of them had no roots at all. After 6 weeks or so, I will transplant them to the greenhouse (potted).
As far as I can judge now, I can take these conclusions:
- Long/short scions : There was no visual difference between the callousing of the short and longer scions. Because the buds of the short scions are in the heated duct, they will sprout earlier, even during callousing. It’s better if they use their energy for callousing only. The sprouting should wait until callousing and rooting of the rootstock is completed. This is also better if the finished stocks are stored in the refrigerator (with dormant buds). The best option imo, is longer scions (to keep the buds outside).
- I didn’t see a difference in the grafting method used. So omega, w&t, U, and bud-grafts, are equivalent calloused. Regarding mechanical strenght I think w&t and omega are preferable. For omega grafting you need a grafting tool, for w&t you must have some skills.
- Applying rooting hormones at the joint of the scion and rootstock did not improve callousing. However, applying the hormones at the base of the rootstock makes a great difference (see pictures below).
- For omega-, U- and budgrafts, raphia isn’t necessary. To close the gaps in the w&t-grafts raphia is preferable. I did only one wrap of parafilm. At the union there should be at least 2 or 3 laps because the parafilm is breaking rapidly when callousing proceeds.

Well calloused bud graft.

Omega-graft

Omega graft. In this case, I removed the raphia and parafilm to see if callousing happened. No doubt.

Omega (and callus) also clearly visible.

Short scions, sprouting too soon.

Without rooting hormones.

With rooting hormones. I deluted clonex gel with water (1 part clonex, 2 parts water), and applied it with a small brush.

Overall view of the new grapes. They have been exactly 28 days in the callousing system.
Jack
7 Likes
That looks great Jack. Thank you for sharing your process in detail. I don’t think you’ll have any problem getting those to grow!
1 Like
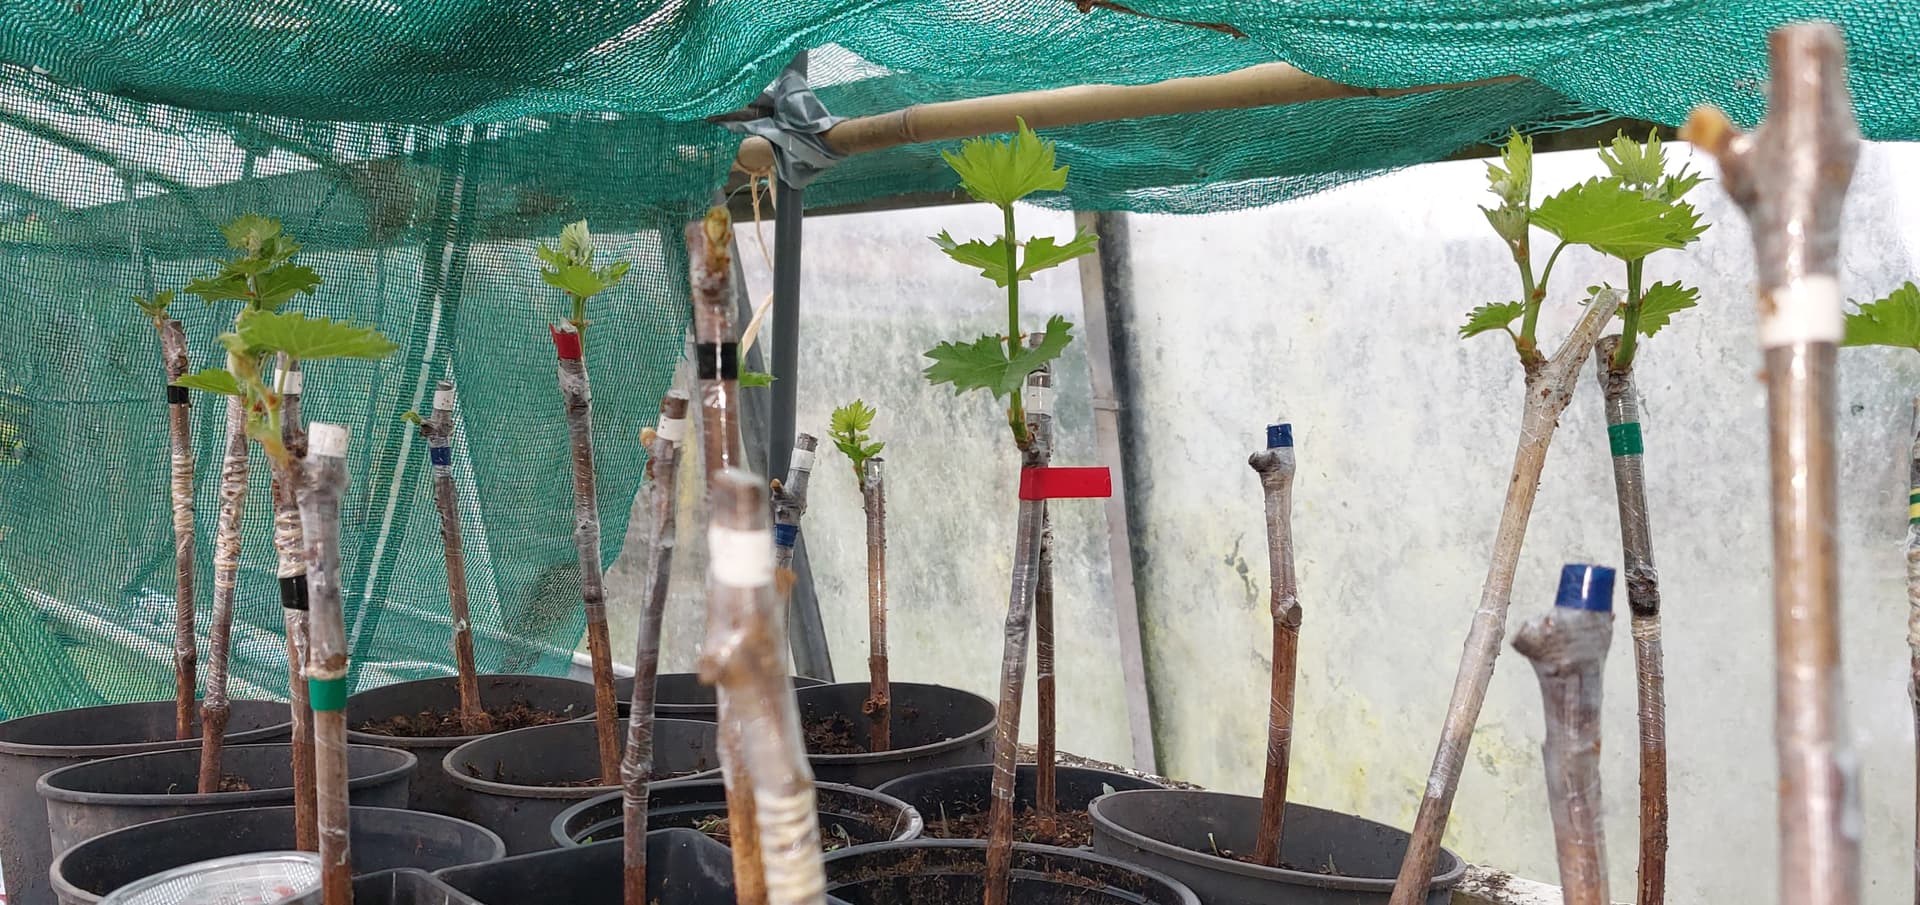
Update
After 6 weeks in the fridge, I woke up the grape plants and potted them up. The photo below was taken 3 weeks after potting. As you can see most of them are already growing back.
Close-up budgraft.

In the meantime I grafted a new series, but this time I used special grafting wax instead of wrapping them with parafilm. This wax contains fungicides to prevent botrytis, and growing additives. Most grafts are only dipped in grafting wax and not tied. If the clearance was too large between scion and rootstock, they were tied up. Rootstocks that were too thin to use the omega-grafting tool were grafted with the w&t-technique.

Covered with moist coco coir.


Callusing after 4 weeks:


3 Weeks after potting up:


In commercial nurseries the grafted rootstocks are waxed the same way. But since they have air-conditioned rooms with very high humidity, the scions will not dehydrate when the wax is bursting as callus is growing. In my setup the humidity around the scions is very low. Therefore it is better to tie and/or wrap te scions with several layers of parafilm too (after waxing).
5 Likes
@ramv Have you reported whether the feijoa grafts took?
@murky, which Feijoa grafts? I’ve been doing a batch nearly every month. none have pushed but all are green. (Green wood that is)
My other trees are also still dormant this very cool spring season.
Mulberries and persimmon grafts have started to push.
2 Likes
I was looking at the pictures from January and wondering if those worked. Sounds like so far so good.
2 Likes
Hello, i just finish reading this really interesting thread! And i have a difficult question. Do you think this setup could work using it in a wood cabin without insulation in France? ![]() Of course i’m not waiting for a yes or no… The problem seems to be big temperatures difference between day and night. So the pipe could be too cold at night. So do you have any idea about what i could try to make it work. Like putting coats around? Or putting straw bale around and something else on top? And one last thing i would like to graft wallnut.
Of course i’m not waiting for a yes or no… The problem seems to be big temperatures difference between day and night. So the pipe could be too cold at night. So do you have any idea about what i could try to make it work. Like putting coats around? Or putting straw bale around and something else on top? And one last thing i would like to graft wallnut.
Thanks a lot for your advices!
If you read Dax’s initial post, he specifically says NOT to graft walnuts with this method. He’s grafted many thousands of trees, I’d listen to his advice. Research other methods for walnuts, they’re available on the forum.
1 Like
on this thread post 273 someone said this: “Just had a long talk with Cliff England from Englands nursery, he did many thousands of hot callus grafts back in the 90s, various walnuts, heartnuts, pecans and chestnuts, really everything, here is his tips. Walnut rootstocks must be conditioned before grafted or will bleed and fail, even while dormant! He advises, 10 days to 2 weeks before grafting, dessicating rootstocks by placing roots in dry compost, then after this “conditioning” graft, put in the tube for 21 days, keep roots in dry compost the whole time or will fail. Start hight on rootstock, if fails to callus, cut it lower and try again, at some point it will stop bleeding and take. He said he wasted a few hundred rootstocks before figuring this out, then did thousands with 90% success. Season, late winter into spring, continued into a cold bot AC cooled shed into april to extend season of hot callus.”
So i think it’s possible that’s why i’m trying to understand…Thanks
1 Like
Walnut grafting - #2 by Fusion_power This is likely the route and advice I’d recommend for walnuts, but let us know if you choose the hot callus route and have success!
Thank you! I wasnt succesfull searching on the forum… I think i don’t know how to use correctly the search engine ![]()
My makeshift hot copper recirculating line callus pipe for a bunch of Prunus on Krymsk86. Space saver style. Great thread full of ideas. My recirc pump is on for about 20 hours a day.

10 Likes
Been reading this interesting thread and want to thank all for helping create an effective cost effective winter grafting solution.
This heat tape thing you are perfecting is a real good idea for us hobby guys. Growers like hot water because it is entirely consistent and they do volume so it pays.
The “self regulating heat tape” is kind of a misnomer. It regulates based on outside temps. It averages 3W per foot at 50F. Can go as high as 6W if real cold. It is not designed to get too or stay at a certain temperature in fluctuating outside temperatures as we do need but just to keep pipes from freezing. It self regulates by using a resistive material between the 2 conductors in the cable that changes density and conductivity with temp. Neat stuff! Thus it only gets as hot as is needed (to thaw pipes) at any spot on the cable and no Tstat is needed. To get to the desired consistant temp with SRC in our application (for which it was not designed) you will have to place the entire calousing structure in a location where the surrounding temp supports the capacity of the cable to get to that desired temperature within the foam tubes. Garage or bsmt is probably in ball park That can also change depending on amount of insulation. Some of you are seeing this now. The higher the surrounding temp the more likely it will get there. IE at freezing surrounding temps it will not be able get to the desired calousing temp in the suggested pipe structure but would still thaw pipes nicely. As you build your structure you should consider this and perhaps experiment first b4 going all in. The caveat with warmer temps being needed outside the calousing structure is that it tends to wake up the roots over a certain amount of time, depending on variety cloned. Kinda shoots the whole purpose in the foot. For sure It can and does work if you can get the outside and inside structure parameters you need or add insulation without too much trouble. After all the ease reliability and low cost of SRC vs hot water is what interests us.
I see we can increase the temp somewhat within the foam for colder outside conditions by doubling the heat tape within the pipe. This may also exceed desired temps. That does cost more and it isn’t cheap heat cable nor is a tstat to control the extra heat. The cable warms and lays flat in the pipe so it doesn’t take up much more room than a single. Messing with extra insulation is also an option I guess but where are we going with all this?
I think I will use a soil heating cable with a dumb tstat attached in future structures like this. Hopefully I can find a soil warming cable without a tstat that I can use with an aux. tstat to control would be nice. This would heat to a set temp and supply accurate wattage needed regardless of outside temp. These are also a lot less expensive.
We have here a good concept and useful structure but alas self regulating heat cable is not ideal or very flexible for some uses. Can work good if in the right spot I guess.
I suppose all is known somewhere. Probably not as much fun as here though.
1 Like
I am not quite sure that you’ve got the correct method of operation there. When my cable for building a hot callus pipe arrived earlier this week I wanted to test it right away and make sure that the wire functioned correctly. Just for giggles I plugged it in to an outlet inside the heated house and let it run for about an hour. It was still cool to the touch. Then I unplugged it and I took it out to the garage. I placed the thermostat portion (that which is circled in white)

inside of the freezer section of the fridge/freezer in the garage, and then plugged the heating cable into an extension cord. About an hour later I came back and picked up the long black portion of the wire that was outside of the freezer and it was amply warm, confirming for me that the thermostat is in that overmolded portion of the wire.
If you have any question, feel free to look over at another thread that confirms this function:
1 Like
You’ll notice Dax mentioned an ambient room temperature range for which one should use the materials he specified. Freezing or hot rooms are not what his design is made for. Other strategies should be used outside the parameters specified if one is unable to maintain the desired conditions.
For me, the garage is just about right, and a room closed off in the basement used to be alright. Now that I have a heat pump water heater I could put this setup near that area of the basement as it keeps the temperature cooler (or I could duct that air towards my callous pipe).
No I didn’t see that mention. People that use this that way seem to be content. I use it in a cold frame so not the best for me.