Till vs No-Till - Rapberry Beds - which gives best results?

If you established / planted a new Raspberry Bed (using No Till Method) this spring, I would appreciate your help to answer a question for me.

I am a bit old fashioned (and Old too)… Those may go together… but I have never created a No Till bed to plant anything… Yes I have a Tiller and I use it. I first break up the ground, 4-5 inches deep (in a fairly wide area, about 2x as wide as I intend for my final Raised Bed to be… then after Tilling a few times, I load it up with Compost, then work that Compost in a bit, shape up the bed nicely, plant it, and cover with deep mulch.

Note in my fields, I have some very thick field grass, lots of Fescue, and other wild grasses and weeds, this time of year very green and lush growing…

Mid April, I propigated several raspberry plants, took mostly root shoots out of my original established raspberry bed, and potted those root shoots up in a nice compost mix, to keep them happy for a few weeks, while I prepared a new bed to plant them in.

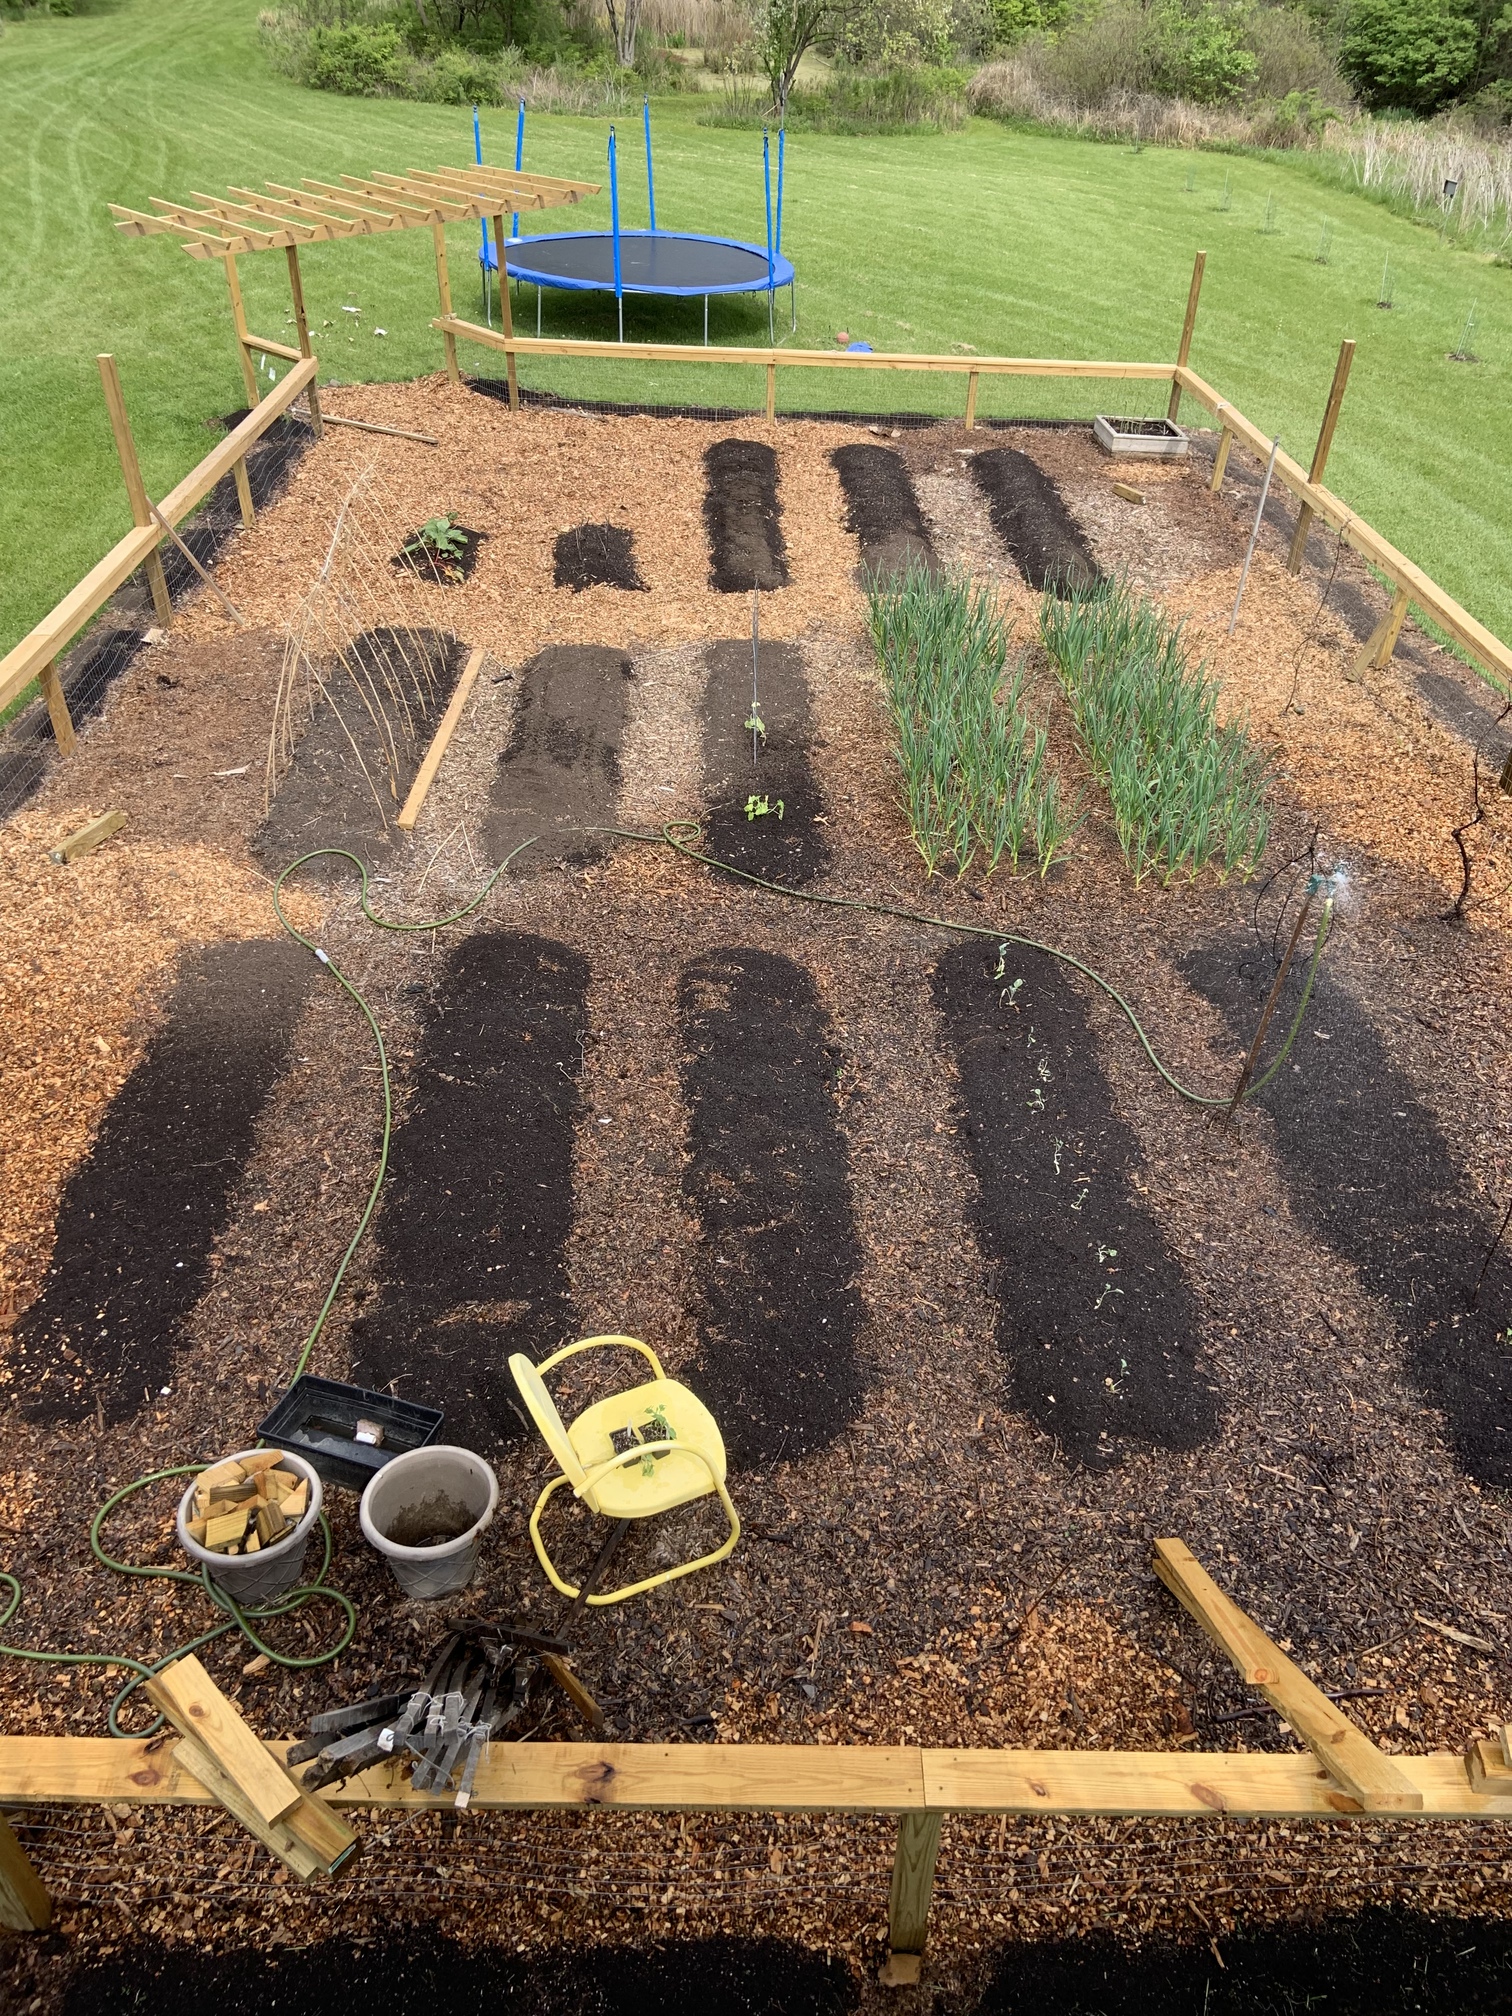
Using my old tried and true method for me… I just went over into that thick grass in my field and I tilled up a 30 ft long, 6 ft wide strip of ground, 4-5" deep. Now the grass was thick, and grass roots fillled all that depth, so lots of organic matter got tilled into that layer. A couple weeks later, I tilled it agian, and well then late April, Early May here, it rained and rained… so i had to just let it sit a while (no problem, all that organic matter breaking down nicely)… but then finally last Saturday it was dry enough to wrork agian… I tilled it up one more time an it was looking good, all that grass and grass roots, broken down nicely, the soil was loaded with earth worms in there eating all that stuff.

Pic one below shows the bed that I had broken up. At that point I had raked some of the soil up to the center of the bed and loaded it up with Compost. - I think I put right at 500 lbs of composted manure, right down the center of that raised bed area and I worked it in just a bit.

This pic was after putting down the compost, and before working it in…

RBB1

You can see how thick the grass is around that area, well all of that in that 6 ft wide strip, had been worked into my original soil there, during the tilling sessions, and had composted into the soil.
the I put the composted manure on to.

I then used a graden rake and hoe, and worked that compost into the bed a little… then I raked more of my soil from the outside edges of that 6 ft wide strip, up to the center, to make it a raised bed.

RBB2

In the pic above you can see what it looked like after I had the bed fully shaped and leveled off a bit, and that compost is just under the top layer of my regular soil there… the compost is worked into the first 8 inches or so, just under that top layer.

RBB3

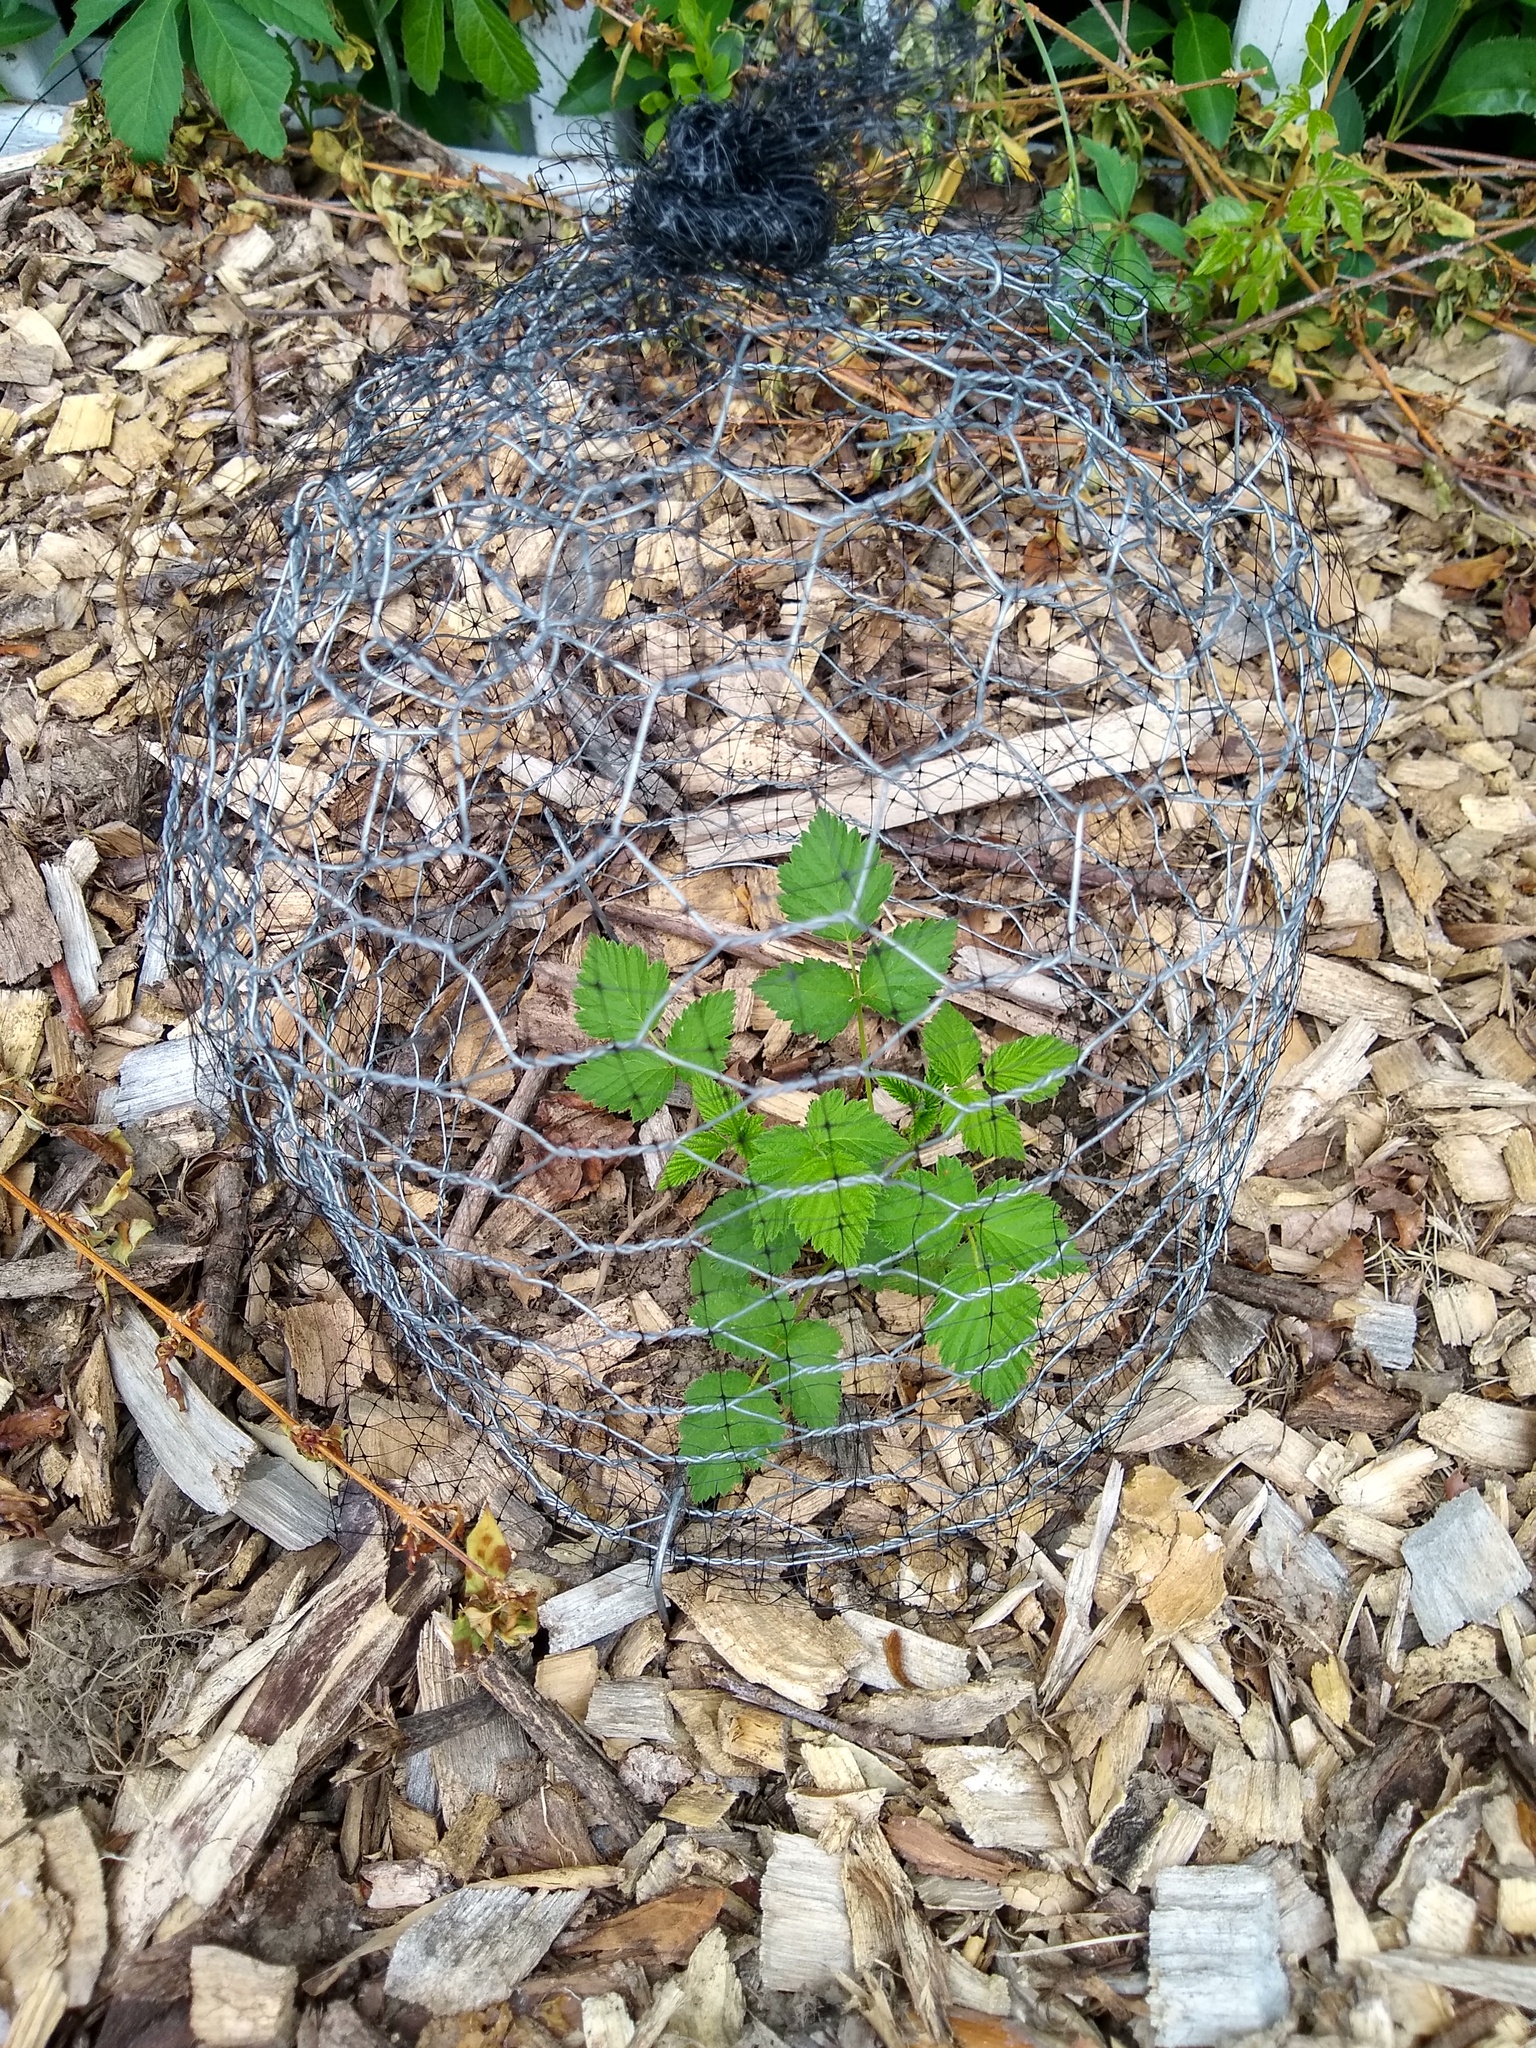
I used a post hole digger to dig my planting hole… my raspberry props were in 3/4 Gal and 1 Gal black pots, so they had a good sized root ball at this point.

You can see as I took soil out of my planting hole to make room for the raspberry root ball, all that compost was just right there in the root zone…

RBB4

This is the last pic I took that day, and I think I had planted 8 Heritage Reds (propagated) into the bed at that point. I had a few more potted up that I added to the bed a day or two later, ending up with a total of 12 plants in that 30 ft bed.

I watered them all in good, and put down a deep layer of mulch to finish it off.

Now, to till up an area like that here on my place, even though my first 4-5" of dirt is pretty good soil, it is also loaded with Rocks. You get a little deeper than 4 or 5 inches and I mean you start pulling up some tiller jamming boulders. In the 3 times that I tilled that little bed, I had to stop and carry off some huge rocks, and throw lots of base ball and soft ball sized rocks out of my field and into the woods.

It is a lot of work, and it is HARD on my tiller, some of those larger rocks will get jammed in the tine area, and actually stall the motor, that happened a few times during that process.

Now I have shown and explained exactly how I established this new raspberry bed, and will continue to provide pics as the plants grow, fruit, etc…

If you started a new raspberry bed this spring, using No Till methods, I would like to see your results.
Did you start off with a Grass covered field ? lay down cardboard, compost, then mulch ?

Please explain in detail exactly how you made your No Till bed. How much compost did you put down (in pounds, or how thick the layer was), etc…

I know for sure that my Till Method works, and works well, but I also know how much work it is.

If I can get the same, or near the same results, without Tilling… I will gladly leave the Tiller in the garden shed next time I do this.

Appreciate anyone that might participate in this Till vs No Till comparison.

It would be ideal to see the results of No Till Raspberry beds started this spring, to compare to my new bed.

But I would also love to see pictures of any No TIll Raspberry beds that you may have established years ago, and how they are doing today, and again please include as many details as possible on exactly how you built that No Till raspberry bed.

Thanks to any that participate !

TNHunter

6 Likes

A little more information, history, results of my Tilled Raspberry Bed results.

In the summer of 2019, I established a raised bed 90’ long 4’ wide using these same methods.
I tilled up a 8’ wide 90’ long slice of my field, 4-5" deep. I did not add any (finished compost) to this bed, but since I was preparing it in July/August 2019 – with the goal of planting it Spring 2020… I simply did a lot of composting in place in the bed as it was being built, and ageing…

After I broke that bed initially, I mowed grass clippings on top of it for 2 months or more, then I tilled those in, raked it all up to create the raised bed, then covered it with 12 bales of hay… and then later on on October, I put another 10 bales of hay on top. Note this was old hay, my brother in law gave me, to clean out part of his barn. It worked great for deep mulch.

So in this bed I just sort of made my own compost in place, started the bed July/August 2019 and planted it March/April 2020.

I planted some Heritage Red raspberries in that bed (and lots of other stuff), and everything grew exceptionally well.

I topped my Raspberries at 48" and they bushed out nicely and we got a nice crop of fall berries, starting early Sept, and continued until Dec 3 (first hard frost),

This Spring, I pruned off the top parts of the canes that died back after fruiting last fall, and pruned the floricans as needed early this spring.

Yesterday morning I took a couple pic’s of both sides of my Heritage Red patch in that bed.

This shows the spring/summer crop that is on now. Looks like they will be starting to ripening early June to me. Lots of berries on, thick healthy looking plants.

So when it comes to a Tilled Raspberry Bed, this shows the results, after a bit more time. First floricans fruiting of my Heritage Reds.

Would love to see the results of your No Till Raspberries for comparison.

Thanks

TNHunter

5 Likes

Nice job. Have you grown other reds beside heritage? I grew it in California and now in Georgia and while it’s reliable it’s flavor is a step below every raspberry I’ve tried with the exception of dorman red

2 Likes

@GeorgiaGent ---- Spring 2020 was my first attempt at growing Raspberries, so I am fairly new to them… but have grown to like them very much… Seem to be very easy to grow, my everbearing types produced fruit the first year (nice fall crop), and now have a nice summer crop on.

I got my plants from Bob Wells Nursery… and decided I wanted the everbearing varieties, and so far I am glad I chose those. I went with - I guess you might say - what seemed like pretty safe bets… chose to try 3 Heritage Reds and 3 Fall Golds. Both were everbearing, and every nursery description of those that I could find, sounded pretty good on both.

So that is what I ordered to start off with… Got them in, labeled as ordered and planted them.

Mid to late that first year, I noticed something odd about one of the plants, it just did not look like the others at all, stems were different color, it grew taller, and in the fall, the others fruited, but it did not.

Turs out I actually got 3 Heritage Reds, 2 Fall Golds, and one Mystery Black Raspberry (summer bearing). They have 4-5 black raspberry varieties at that Nursery, so not sure which variety it is, but it is a summer bearing black of some kind.

This Spring, I noticed the Ohio Treasure Black Raspberry (a everbearing black) and ordered some of those. I have those started in a different bed, different location. Hopefully this fall we will get to try some of those.

Other than that I have a LoganBerry that I got from OGW in Spring of 2019 and planted it in a morning sun only location. It produces LOTS of berries, and is very early. I have some of those ripening now, expect to eat first fruit from that this weekend. They are very flavorful, but very tart too (really no sweetness)… unless you let them go from Red to Purple, then let them stay Purple a few days,they will turn deep purple and start to shrivel a bit - then they are a little sweeter.

My wife will only eat the deep purple ones… she prefers sweetness… and the Logans just don’t have much of that. I can eat them earlier on when they first change from Red to Purple… they are very tart, but also very flavorful… and if you eat them with other berries, WOW very good. For example a Logan and a Strawberry together… awesome.

Now last fall, we harvested Heritage Reds and Fall Golds from early Sept, to Dec 3, got to try plenty of both for a couple of months there.

My only other Raspberry experience is unfortunately the ones available at our local grocery store (mostly our Super Walmart fruit)… and the home grown Heritage Reds were just WAY better than any Walmart Raspberry I have tried. The Fall Golds were also very good, good flavor and definitely more sweet, my wifes favorite by far.

So that is my limited experience with RaspBerries.

I would welcome and recommendations on other varieties that might help round out my Raspberry collection. I am a BIG raspberry fan now. Wish I had started growing them 20-30 years ago.

One issue that I have to consider is this… I saw SWD fruit fly on my Illini BlackBeries very late July, Early August last year. I did not know what they were then, just new it was some new/different pest that I had not seen before.

So when it comes to Raspberry varieties for me to try - I think it would be best if I stick with varieties that will ripen fruit in June, Early July.

Perhaps Early, to Early/Mid, perhaps even Mid season ripening varieties might work.

Mid/Late, and Late, think I will have to pass on… I expect the SWD would get most of those.
I have read, searched, and talked to others here on some varieties that came highly recommended, and and what I have read, and seen on youtube about them, they do sound outstanding…

Like Royalty Purple… and Josephine, But unfortunately both are Late Season to ripen.

We are very happy with Heritage Red and Fall Gold, can’t wait to try the Ohio Treasure Black this fall.
I have a Very Early berry (flavorful, but tart) in the Logans.
I think the Heritage and Fall Gold may be quite Early, or Early Mid (on the summer crop)

My Heritage have mass reproduced by root shoots… I started with 3 last spring, and how have like 24 others planted in new beds, different locations, etc…

The Fall Golds, are not nearly as easy to propigate, they are just not as hardy as the reds, so I have only had success at propigating a couple of thsoe.

Thinking of what my wife would like… a Sweeter Berry (of any color) would be her choice.
She just has to have the sweetness, hopefully with some good flavor too.

Are the any Raspberries that you or others can recommend that would fit that >

Early, Early Mid, perhaps at latest Mid season ripening, good Flavor, with Sweetness, nice size berry, very productive. Of course I like to spread them around, so one that is very vigorous grower and reproduces by root shoots, would be ideal too.

Red, Black, Gold, Purple… color really does not matter as long as it hits most of those.

Thanks

TNHunter

1 Like

My opinion; no till farming has some very solid attributes for annuals, it is less beneficial on a backyard than on a large scale industrial production, and for perennials I personally think that the benefits disappear under the benefits of tilling.

On backyards we mulch a lot which takes away the water benefits. When we plant perennials we only disturbs the soil once, creating multi year benefits from a single bout of labor. We (again, backyard/small scale gardeners) don’t use chemicals wantonly, so pesticides and fertilizer runoff is not as big a deal.

And is not that no till is any less labor, you are just switching one type of labor for another that again, with perennials and how we grow them are not as remarkable.

Last week I pulled this guy from under a jostaberry bush. I didn’t realize it was this big but as I could feel it giving up out it came, without having to dig it up. Because of the composition of my soil (over half rocks, the rest sand) I plant them in what I call inground lowered beds… The plant has enough good soil to support two of them on just the good stuff, but as the years leach nutrients into the surrounding soil they’ll go there.

3 Likes

my original 15’ x40ft raspberry patch i did the same as you but it was lawn before. i too have fist sized and some bigger rocks in heavy clay soil. it was back breaking work. now i just till to control shoots from filling in between the rows of berries a few times a season. since then ive planted cane , bush and tree fruit by putting down a few layers of card board, put the plant on that then mound the soil to cover the roots, mulch about 3in thick. its smothers the grass and then as the grass rots it feeds your plants. 95% of my 60 + types of fruit ive planted were planted this way. its a hell of a lot easier than tilling. the stuff i put on mounds 5 years ago are almost level now as the soil has broken down and the plants roots are established well.

1 Like

@steveb4 … let me make sure I am understanding correctly…

You have successfully started friit trees and berry bushes, by simply covering the grass in the yard/lawn with cardboard, then piling soil on top of that, and planting your fruit trees, berry bushes in the mound of soil and then you mulched it in good.

You did not use compost, just some decent soil you got from your property ?

If you were planting something like a Apple Tree or Peach Tree, with some pretty good roots on, you would have to put down quite a bit of cardboard - Right (what a 4x4 ft circle ?) and then at least a few wheel barrows full of soil on top of that to plant the tree in ?

Sorry to be asking for great detail, but I would really like to try this, may make one this fall, for planting next spring, and want to make sure I understand exactly what work well this way.

Thanks
TNHunter

1 Like

yes probably close to 75 total now. never lost a plant either. my clay soil has kiilled 2 apple trees and a few bushes planting directly into the ground so i basically did this out of necessity initialy. i have a pile of loam i bought and mixed that with composted chic manure about 2/3 to 1 /3. for trees and bigger bushes i would drive a stake thru the cardboard into the ground, plant the tree and tie it off to it.until established. yes for bigger trees, to save on soil i built a 12in tall 3’ x 3’ raised cedar bed and planted into that also covering the ground with cardboard. saved me alot of work. cant imagine i would have planted even a small amount of what i have if i had to dig a hole every time. leaned this trick from a guy on permies.com. he had heavy/ rocky clay as well . he planted a food forest on 2 acres that way in one season. i did a little at a time so it took 5 yrs and im still adding some things. once every thing leafs out ill take a pic of my property and post it here.

2 Likes

@steveb4 … a big pile of loam mixed with chicken manure… sounds like just what I need.

2 Likes

I’ve been experimenting with a few different methods. As an actual experiment, the design is terrible. I have a small lot (50x100 feet) so I haven’t replicated anything and each different style of “no till” has been done with different cultivars.

In my front yard, I clipped the grass very short, dug a trench (amended the soil with 1 bag of composted manure) and then covered the remaining grass with contractor paper. Since this was the front, I mulched with decorative wood mulch from a local place. Unfortunately, the bare root plants I had ordered were arriving just as the pandemic was getting started. They weren’t from the best nursery and were DOA. It wasn’t until midsummer that I was able to get some heritage and double golds in 2" pots. We had an extremely dry summer and the plants struggled. Still, they came back strong this year. I fertilized when they started to leaf out with hollytone. The heritage in particular spread like crazy.

In the back, I mulched over uncut grass with oak and maple leaves last fall. This did a good job of killing the grass, but violets, creeping Charlie, etc. came back stronger than ever. I planted bare root Boyne and Prelude from Nourse about 3 weeks ago. They have started to leaf out from the canes. I didn’t amend here, just the leaf mulch. I chased a doe out of here earlier today.

Last spot, also in the back, I put down a thick layer (8") of arborist wood chips. It killed the grass very well. Violets and dandelions still made it through. Here I planted dormant tissue culture plugs of Bristol black raspberries (also from Nourse). They have grown pretty well so far. Some baby bunnies tried to make a meal out of a few, so they are under some chicken wire cloches until they get a bit bigger.

I’m not against tilling, but getting a tiller with any power in our yard would be tough. So far all methods seem viable.

3 Likes

@Megan_6a …LOVE the view from your porch.

TNHunter

1 Like

@TNHunter Thanks! It’s definitely still a work in progress, but a lot better than the half dead lawn that was here when we moved in 2 years ago. :slightly_smiling_face:.

Sometimes I am jealous of all you folks with more land, but this tiny plot is still plenty of work!

2 Likes

I am a big fan of no till in small garden beds. I put down cardboard over grass, then leaf mulch, then compost and wood chips. I have raspberries in some of the beds below, but I just planted them this spring. I added another row to the garden and you can see the layering of cardboard and leaf mulch.

2 Likes

@TNHunter
Want to compliment you on the great job i think you did. Everything you did up to this point i totally agree with more or less. I usually top dress the soil with wood chips after tilling and adding compost. My version of growing things is slightly different than most and its likely their production is better. These are one year old black rasberry plants. I’ve developed them into a more wild than tame variety through the years.


These are new tip starts from last fall

This is an old plant getting ready to start a new plant as you can tell by the ultra long cane.

Look closely behind the bush yes its an autumn olive. Im cheating in two ways using a plant that is a nitrogen fixer and by breaking up the types of plants should a disease start it cant go down an entire row of plants.

Ok so i know noone is convinced but zoom in on the stems we know green stems are one year growth. Look at the growth rate i have had in one month. Remember may is not over so plants have been growing about a month. Thats growing beside an old chicken yard as well but they grow like that just about everywhere. The raspberry dont like full sun on my property they like some shade like a goodeberry here. I cannot grow red rasberries at all but yellows or blacks grow fine since they are hardier.

If you look at this thread you will see our methods are very similar. The reason i planted a row of solid carmine jewell was for spraying purposes. These rasberries do not require spray. Carmine Jewell Cherry Yields increasing with age. So back to your original question why not till anymore it worked great so far? My opinion is for several reasons #1 It disturbs the earth worm colonies #2 it disturbs the soil which results in more weeds like a scrape on your arm a weed is natures band aid #3 the soil is not compacted thats what the first tilling was for. #4 it will disturb your rasberry plant roots #5 dries out the soil. All that said if you like to till instead of applying wood chips i dont think it hurts much. You have heavy grasses on all sides so the erosion is minimal and the earth worms will recolonize quickly from the grassy areas. What your doing looks nice and it’s effective. I’m getting the results i want but the thing is your likely using the method to get the results you want. If you look closely you will find out my true agenda there is still a chicken pen in there. The bushes grown like that supply chickens with shade , fruit, and lots of insects. They supply the bushes with fertilizer we get eggs. Im not raising chickens right now but you see my plan. By the way you till to get organic material in the soil but dont forget now the cycle of rasberry roots growing and dying does that for you. My black raspberries get stronger every year accliminting more to my property all the time. Soon they will take off like never before.

1 Like

My raspberry bed is about 25 years old. I have needed to reestablish it by cleaning out the roots of the giant western red cedar that is only about 20’ away. When I first planted this bed, I did not realize how invasive red cedar can be, but I was aware of how fast raspberry roots can spread out of control. So my first bed was a raised bed with lots of horse manure compost. After about a year or two of good production and lots of nice berries, I noticed in spite of my watering faithfully during the bearing stage, that we were getting fewer berries. The next spring I began to notice that new growth came very slowly on the end closest to my cedar tree. So I dug down to explore fining more cedar roots tha raspberry. I waited until fall because I was frustrated that all my labor had been defeated. It took me several weeks of planning to improvise a bed that could be successful over cedar roots.
Finally I concluded that most roots need a soil medium to grow; therefore, if I could build a raised bed on top of air, then it migh5 work. So I set about doing just that. Supporting a 1’ deep column of soil on air is somewhat of a challenge, but I happened to have an abundant supply of old clay bricks. I used the bricks to support the base of my bed (corrugated roofing) and r eplanted my raspberries. That task was completed about 15 years ago. Now all berries stay faithfully inside, no cedar roots are invited to take my nutrients, and there in never any tilling involved. Each year I just add some more leaf and horse manure to feed the berries! I might suggest that before your berries migrate too far that you consider placing an impenetrable barrier around the bed about one Foot to 18” deep. Then your berry roots will all stay inside!
Good luck, I vote for no til
Dennis
Kent, wa

2 Likes

cost me $100 for 2 yards delivered 3 years ago. still got 2/3rds left. wasnt the best stuff. mostly silty clay but no rocks. the chic manure fluffed it up some.

1 Like

Forgot my pics of cedar tree and raspberry bed! Lol

4 Likes

i have 60 different fruit plants/ trees groundcovers and medicinals of many cultivars growing on 3/4 acre of what was once grass. if you plan well its amazing how much you can grow in a small area. good job! i never could bring myself to waste land growing grass when you can grow something to eat. :wink:

3 Likes

excellent work! looks so neat and clean.

I got into raspberries about 5 years ago. In the spring of this coming year i should have 6 varieties of reds and around 10 varieties of black rasps.

I started by tilling… i have a wonderful Troy Bilt Horse that is around 40 years old.

Tilling and heavy mulch has created a great world for weeds… after a while i just have to say im over it.

I am not happy with the amount of work it takes to keep my rows in check. So i am re-doing everything in the spring.

Game plan- 1 roll of Kraft paper 36" X 1000ft. $67 at staples.

I should have around 250ft of raspberries so i can go 4x on the paper.

I plan on making a lasagna row. Paper then leaves on top of the paper, then compost on top of that, then woodchips on top of that. Leaves will be piled in the fall to compost all fall and winter.

The biome of the soil and the moist leaves will take care of the paper all while smothering the grass underneath which will in turn compost.

I plan on doing no irrigation, no fertilizing. And hopefully very little weeding.

It sounds like a make work project but in all fairness i am removing 5 or so varieties of reds that have wandered into the row… and i want to play with some other varieties of blacks…so its a good time for me to experiment.

1 Like