Good system for preparing winter dormancy graft cuttings

Hello guys .
Welcome to my first post.
In this post, we are going to deal with the subject of graft cuttings that are collected in the latent period, and I will try to describe the process as I do it, since I have had problems with fungal contamination (cuttings from friends), if this process is not done.

First of all, a crucial question
When should cuttings be cut for grafting?

From my point of view the best time to collect cuttings is in the time most coldest of winter, the cuttings will be in a total state of latency and with the cold, the wood becomes lignified, thus multiplying the success rate in our future grafts.

What calibers are suitable?

Between 3 and 8 millimeters in diameter, it is an adequate thickness, so if we send grafting material to a friend, at least three cuttings per variety should be sent in different calibers, in order to be suitable for their rootstocks.

Worldwide, the ziploc plastic bag is widely used for shipping cuttings, with a moistened piece of paper, to guarantee the freshness of the cuttings during shipment.
Big mistake, since with the humidity, the appearance of botrytis is being promoted , which is the fungal disease that contaminates the cuttings, .

Which parts of the branches are the most suitable for collecting cuttings.
The water sprouts of the variety (straight branches of wood, not fruitful) are the most suitable.

In these photographs you can see some pieces of suckers of a variety of stone fruit

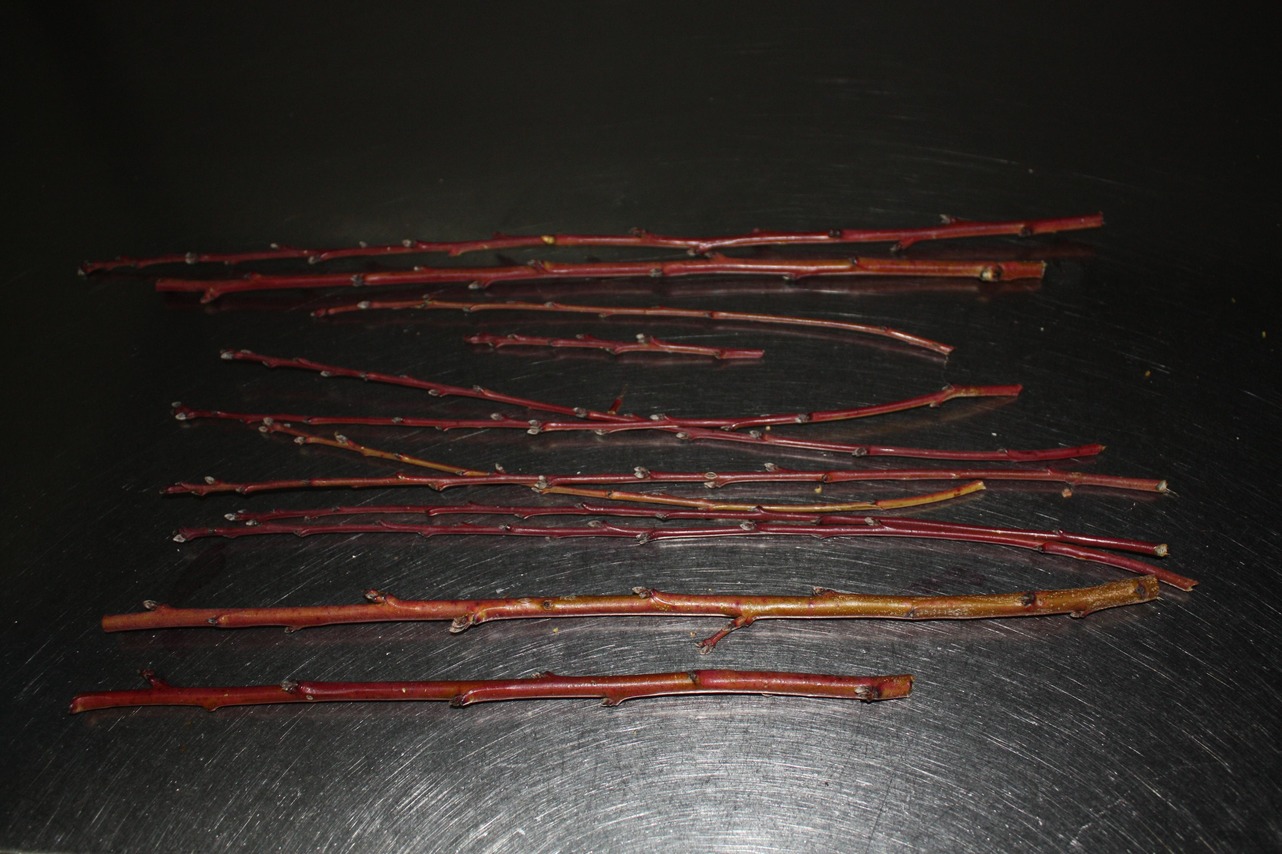
The proper size of the cuttings would be approximately as long as a pen, and in different gauges

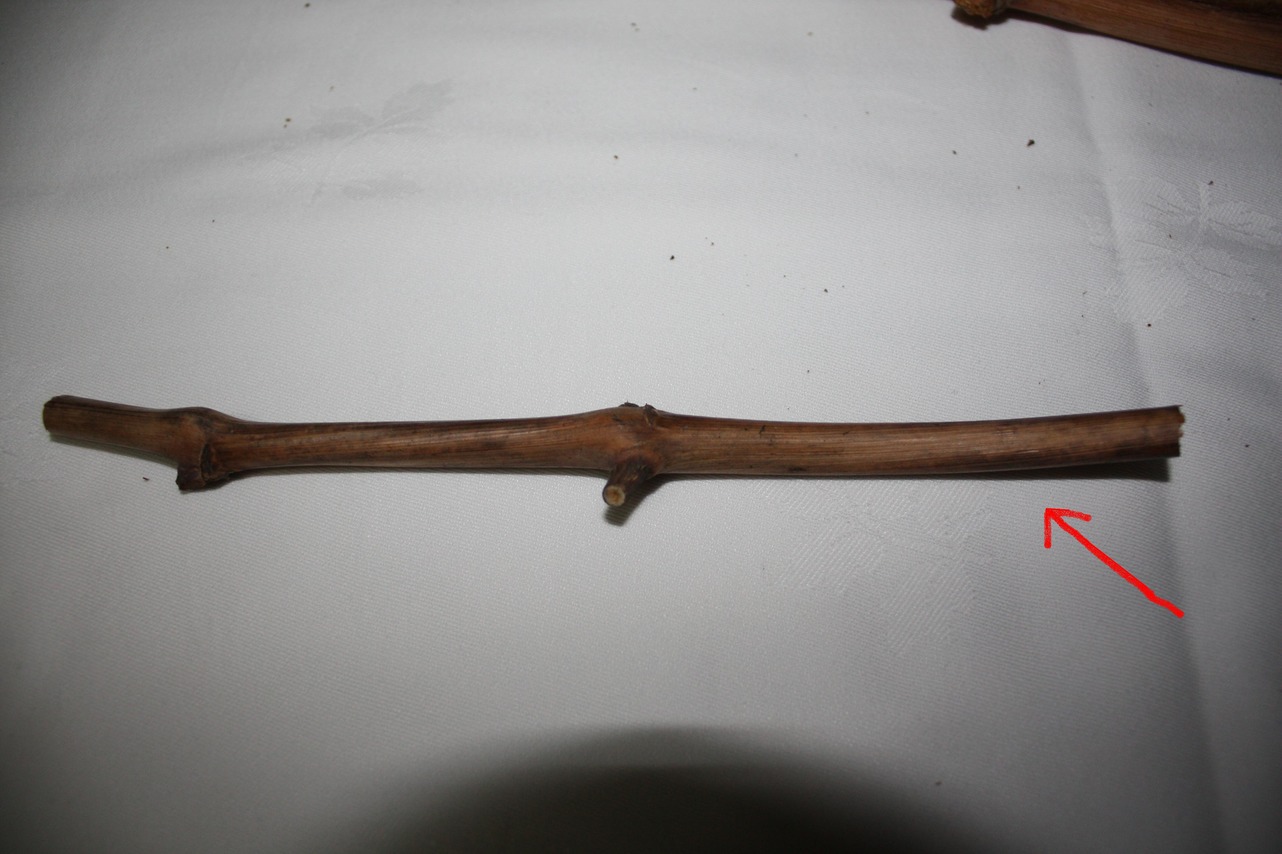
And for grape cuttings, it is necessary that the cuttings have at least two viable buds

It is necessary to leave a good piece of wood below the lower bud (marked with a red arrow), which is where we are going to practice the graft bevel, so that once grafted, we will have two viable buds for sprouting

But we cannot keep them that way, nor can we send them in this way, so we will apply the method used in fig cuttings for rooting.

We will need these two things:

  • Tap water
  • Normal household bleach

Is necesary have to prepare a dilution of 9 parts of water and one part of bleach.
The appropriate thing, if we are going to prepare a lot of grafting material of different varieties, is to make a dilution bucket of nine liters of water and one liter of bleach, and now you will see why so much quantity .

If we only have a container with water and bleach, to deposit all the cuttings of different varieties, the same thing always happens “everything ends up mixing” hahahahaha, and we will have problems identifying the varieties

The ideal is to cut a few plastic bottles, where we introduce the dilution, and each bottle will be worth a only variety.

in this way

You can see that each variety is in its bottle, and there is no risk of mistakes, and it is essential to put the name of each variety written on a piece of paper under each bottle (all precaution is fews ).

How time is necesary to leave the cuttings in the dilution?

Well, between 10 and 15 minutes (nothing happens if it is more), and it is interesting to turn them from time to time, so that they soak well on both sides.

Once the hydration and disinfection time has passed (15 or 20 minutes).
An absolutely clean cloth tablecloth is spread on a table, and the cuttings are deposited, with their labels in front ( I repeat, all precautions with the labels are fews ).

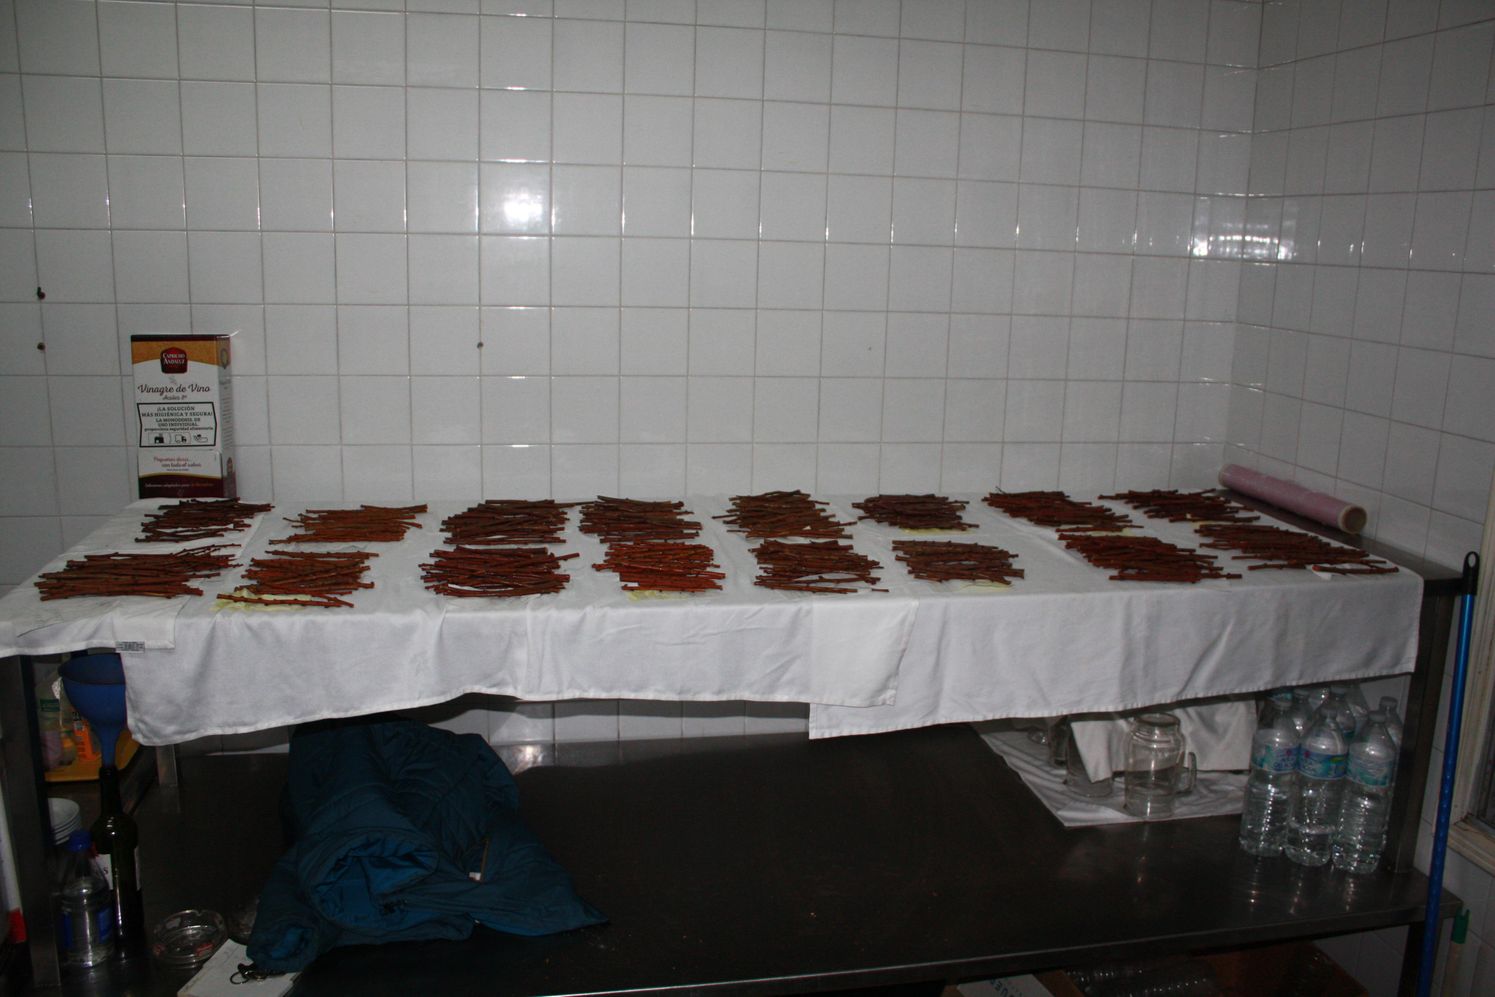
It is necessary to leave the cuttings on the tablecloth (they are turned from time to time), until their total and absolute exterior drying.
This process can last perfectly an hour and even more, it depends on the wood of each variety, and the ventilation of the room.

What is the purpose of leaving its exterior drying?

Very simple, with this process, what we have done is a good internal hydration of the cuttings, and in their external part “that is without humidity”, microscopic crystals of bleach have been formed that will prevent fungal contaminations, inside the the wrappers.

Now once the cuttings are externally dry, they must be wrapped.

A quality plastic film is used, I recommend the one I use, which is the “violet catering plastic film”, this one:

And we proceed to wrap, avoiding as much as possible the accumulation of air inside (that is, we wrap them by pressing well), and doubling well at the ends, like this.

Once well wrapped, the label with the name of the variety is placed

We continues wrapping well, doubling well at the ends, and the film is stretched to cut it, obtaining the packets.

We already have the cuttings packages, totally ready, to be refrigerated until grafting time, or to send it without fear to the end of the world.

The refrigeration temperature is essential for a good conservation of the cuttings, and should be between 1 and 2 degrees Celsius (33.8 Âş to 35.6 Âş Fahrenheit)

It is a very simple process, and really surprising, since when opening the packages in spring-summer, the state of the cuttings is as freshly cut.
I personally have successfully grafted with refrigerated cuttings from the previous year, and after a year and several months they were in perfect condition.

Regards
Jose

P.S .: Sorry for my bad writing, but I have to use google translator and sometimes it makes mistakes

63 Likes

Excelente! Todo bien entendible.

2 Likes

@scottfsmith, @mamuang this is a excellent guide for preparing scion. Unless someone finds a major flaw in the technique I vote it should be added to the Guide category.

4 Likes

Hi Danzeb
I’m flattered , I’m very happy you liked it .
It is the technique used for cleaning and disinfecting fig cuttings, applied to the best possible way of conserving winter cuttings, of any fruit variety.
I understand that it is a somewhat laborious process, but the result is “INCREDIBLE”
The cuttings have their internal humidity, but externally they are dry, so that when wrapping them in good quality plastic kitchen film, a sterile microclimate is generated inside of the packages due to the presence of microscopic bleach crystals on the surface of cuttings, which prevents their desiccation and fungal contamination.
It is necessary to test this system, to really see the good results it gives.
Now I am collecting cuttings from my orchard , and I take them to an industrial cold room in my restaurant.
When I have all the collected material, I will take some pictures so you can see how exaggerated some Spaniards are (there are cuttings to graft a whole country) hahahahahahahaha, but I have many friends.

Regards
Jose

16 Likes

Bienvendio y muchas gracias!

Thanks so much! I shall print it out for re-reading in February when I cut apples and peaches.

I wonder if this thread should be left here a while longer so more members can see it. I’ve found that new or relatively new members do not always check out our Reference ot Guides categories.

I can move the thread to Reference after a while,

6 Likes

You hit the nail on the head Jose! Fig cuttings are notorious for their tendency to rot while rooting… I am wondering if I can do this treatment to cuttings once I receive them, since it is probably hard to convince or even ask people I am getting cuttings from to follow this laborious protocol.

Thank you. This is a very detailed step-by-step process for newbie like me for future reference.

Great job @Jose-Albacete very helpful and concise! :+1:

Very interesting! I’m not at all expert but the soaking in bleach solution seems scary to me.

thank you. Excellent step by step instructions!

Sure, @harveyc’s cuttings come already treated, hence their higher success rate.

1 Like

Excellent, thanks so much for sharing this Jose!

I vote to leave the thread here for longer, or perhaps just double it and put one in the guide section and leave one here.

4 Likes

Second vote for a copy in both places.

1 Like

Practical , systematic, easy to do /follow, very good guideline​:+1::+1:

I do use bleach solution , but I always rinse off the bleach right after the soaking. I don’t soak that long either , only few minutes if not seconds, long enough to let the bleach cover all the scion surface. Do you think I should rinse or not rinse the bleach off the scions? I guess the answer has to do how long the bleach is effective before it breaks down. And what does the bleach do to the scion tissues ( keep in mind , bleach is a very corrosive chemical ).

Ahmad, this system can be carried out upon the arrival of cuttings sent by a friend to your house, to prepare them well for their refrigerated conservation.
And it is essential when you are going to send cuttings to friends from other countries, to avoid fungal problems during the days of the trip.
Unfortunately, there are times when the packages are traveling for more than 15 or 20 days, so if the cuttings are not sent with this method, they run the risk of arriving contaminated and unusable.
Carrying out this type of work is a simple matter of courtesy and “elegance”, since if the person you send cuttings, the package is sent ready to be refrigerated, obviously the person receiving the package will appreciate the effort.
In my country years ago, cuttings were sent in any way, but since people have been able to verify the good results, it has become the standard system for shipping cuttings.

IL847, both the proportions of water and bleach (1 part bleach, 9 parts water), as the time of cuttings in dilution (15 minutes approximately) are correct measurements and correct times widely used for hydration, cleaning and disinfection of cuttings woody vegetables.
The cuttings should " NEVER " be rinsed with clean water, otherwise the process is useless.
It is “ESSENTIAL” the complete external drying of the cuttings (here the time of the cuttings on the cloth tablecloth, can vary greatly, depending on the ventilation of the room, from 1 hour if there is an open window and a draft, at more than 6 hours if there is no ventilation), the important thing is that they are perfectly dry on the outside.
Do not worry, and let them dry well, since inside they have an incredible reserve of humidity, which will not be lost inside the plastic film wrappers.

I am totally sure that some of the members of this forum have used this system for hydration, cleaning and disinfection of fig cuttings

Regards
Jose

10 Likes

The bleach treatment and drying I do agree with, but everybody compulsively puts in that moistened paper, and he is right that it is not only unnecessary, but a detriment. Just push all the air out of the ziploc and seal it, but THAT’S ALL THAT IS NEEDED. They invented ziplocs to prevent the contents from drying, so why even wrap with film? A whole bunch of treated cuttings can be put in a ziploc with the air pushed out and do fine. Don’t work so hard!

2 Likes

I have a related question about the bleach solution. I process small batches of cuttings through out the winter. I am wondering how many days the bleach solution stays potent. Bleach is cheap, but mix a batch every few days is kind a task. It would be nice a batch of solution can last whole winter.

2 Likes